Provisioning a Windows Azure Active Directory Tenant as an Identity Provider in an ACS Namespace
Thanks to the improvements introduced in the latest refresh of the developer preview of Windows Azure Active Directory, we are finally able to support a scenario you often asked for: provisioning a Windows Azure Active Directory tenant as an identity provider in an ACS namespace.
In this post I am going to describe how to combine the various parts to achieve the desired effect, from the high level architecture to some very concrete advice on putting together a working example demonstrating the scenario.
Overview
Let’s say that we want to develop one MVC application accepting users coming from both Facebook and one customer’s Windows Azure AD, say from Trey Research, which uses a Windows Azure AD directory tenant for its cloud-based workloads.
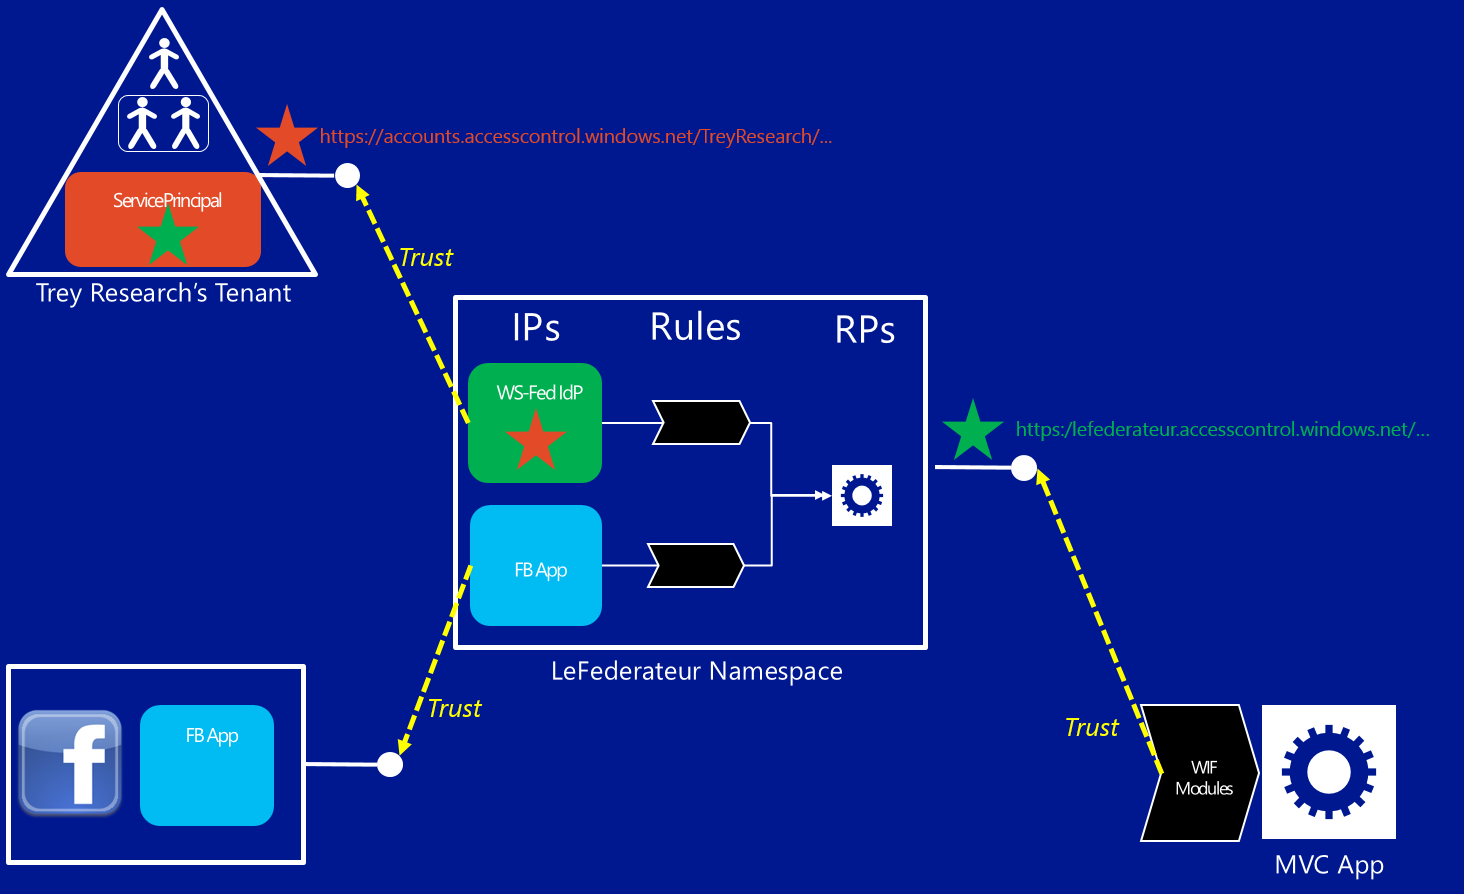
One way in which you could decide to implement the solution would be to outsource most of the authentication work to one ACS namespace (let’s call it LeFederateur, in honor of my French-speaking friends) and configure that namespace to take care of the details of handling authentication requests to Facebook or to Trey Research. Your setup would look like the diagram below (click on the image for the full view).
From right to left, bottom to top:
- Your application is configured (via WIF) to redirect unauthenticated requests to the ws-federation endpoint of the ACS namespace
- The ACS namespace contains a representation of your application, in form of relying party
- The ACS namespace contains a set of rules which describe what claims should be passed on (as-is, or somehow processed) from the trusted identity providers to your application
- The ACS namespace contains the coordinates of the identity providers it trusts; in this case
- There is an entry for a Facebook application IdP type, created according to the usual ACS provisioning flow for Facebook apps
- There is an entry for a WS-Federation IdP type, pointing to the Try Research’s directory tenant. To be exact, pointing to the metadata document hosted at https://accounts.accesscontrol.windows.net/treyresearch1.onmicrosoft.com/FederationMetadata/2007-06/FederationMetadata.xml
- Facebook contains the definition of the app you want to use for handling Fb authentication via ACS
- The Trey Research’s directory tenant contains a service principal which describes the ACS namespace’s WS-Federation issuing endpoint as a relying party
I am sure that the ones among you who are already familiar with the concept of federation provider are not especially surprised by the above. This is a canonical topology, where the application outsources authentication to a federation provider which in turn handles relationships with the actual identity sources, in form of identity providers. The ACS namespace plays the role of the federation provider, and the Windows Azure AD tenant plays the role of the identity provider.
Rather, the question I often got in the last few months was: what prevented this from working before the latest update?
That’s pretty simple. In the first preview ServicePrincipals could only be used to describe applications with realms (in the ws-federation sense) following a fixed format, namely spn:<AppId>@<TenantId> (as described here) which ended up being used in the AudienceRestriction element of the issued SAML token. That didn’t work well with most of the existing technologies supporting claims-based identity, including with ACS namespaces: in this specific case, LeFederateur would process incoming tokens only if their AudienceRestriction element would contain “https://lefederateur.accesscontrol.windows.net/” and that was simply inexpressible. With the improvements we made to naming in this update, service principals can use arbitrary URIs as names, resulting in arbitrary realms & audience restriction clauses: that restored the ability of directory tenants to engage as identity providers through classic ws-federation flows, including making ACS namespace integration (or any other federation provider’s implementation) possible.
Walkthrough
Enough with the philosophical blabber! Ready to get your hands dirty? Here there’s a breakdown in individual tasks:
- create (or reuse) an ACS namespace
- create a Facebook app and provision it as IdP in the ACS namespace
- create (or reuse) a directory tenant
- provision a service principal in the directory tenant for the ws-federation endpoint of the ACS namespace
- provision the directory tenant’s ws-federation endpoint as an IdP in the ACS namespace
- create an MVC app
- use the VS2012 Identity and Access tools for connecting the application to the ACS namespace; select both Facebook and the directory tenant as IdPs
- Optional: modify the rule group in ACS so that the Name claim in the incoming identity will have a consistent value to be shown in the MVC app UI
many of those steps are well-known ACS tasks, which I won’t re-explain in details here; rather, I’ll focus on the directory-related tasks.
1. Create (or reuse) an ACS namespace
This is the usual ACS namespace creation that you know and love… but wait, there is a twist!
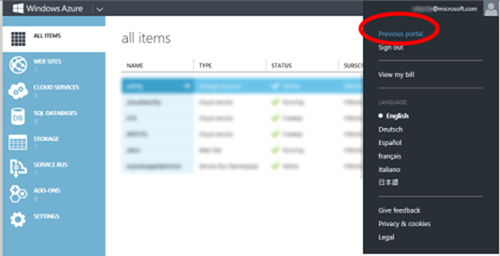
In order to create a namespace you need to use the Windows Azure Silverlight portal, and I occasionally heard that people using the HTML5 portal as their default might not know how to get back to it. The trick is to click on your email in the top-right corner of the HTML5 portal; at the very top you will find a link that will lead you back to the Silverlight pages with their ACS namespace creation settings.
If you want to reuse an existing namespace you can go straight to the ACS management UI via the usual <a href="https://.accesscontrol.windows.net/”>.accesscontrol.windows.net/”>https://<namespace>.accesscontrol.windows.net/.
2. Create a Facebook app and provision it as IdP in the ACS namespace
Follow the ACS documentation here.
3. Create (or reuse) a directory tenant
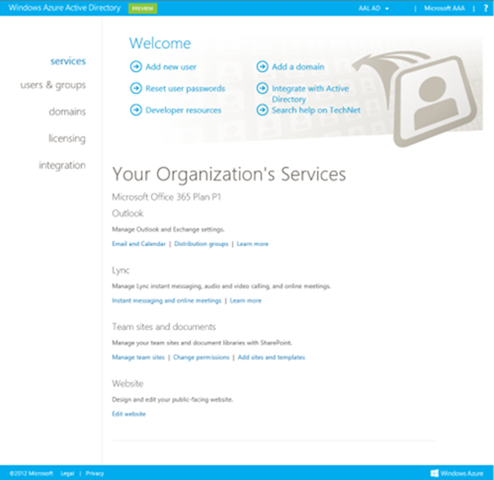
Obtaining a Windows Azure Active Directory tenant is very easy. For example:if you are an Office365 customer, you already have one! Head to https://activedirectory.windowsazure.com/ and sign in with your organizational account: if you are an administrator, you’ll see something to the effect of the shot below:
In fact, be warned: in order to go through this walkthrough you *have* to be an administrator.
If you don’t already have a tenant, setting one up is fast and painless: follow this link to set up one for free as part of our developer preview program.
If you create a new tenant, the first user you generate as part of the signup process will also be an administrator; keep the credentials of that user handy, because you’ll need them in the next step.
4. Provision a service principal in the directory tenant for the ACS namespace
From this point on, things get interesting. You need to let your directory tenant know about the existence of your ACS namespace: the web SSO (in this case, WS-Federation) endpoints won’t issue tokens for any recipient, only the ones represented by a service principal object will be deemed eligible.
As of today, the Windows Azure Active Directory portal does not yet offer commands for creating service principals; so your most straightforward option get that done is by using the Office365 cmdlets, These can be downloaded from here (please read the instructions carefully, especially for what concerns prerequisites and x86 vs x64 platforms).
Once you have installed the cmdlets, double click on the new PowerShell shortcut on your desktop (“Microsoft Online Services Module for Windows PowerShell”) and enter the following (after having substituted lefederateur with your own ACS namespace)
1:
Connect-MsolService
2:
Import-Module
MSOnlineExtended -Force
3:
$replyUrl
=
New-MsolServicePrincipalAddresses
–Address "https://lefederateur.accesscontrol.windows.net/"
4:
New-MsolServicePrincipal
–ServicePrincipalNames
@(
“https://lefederateur.accesscontrol.windows.net/”
)
-DisplayName
“LeFederateur ACS Namespace”
-Addresses
$replyUrl
Now, before you accuse me of witchcraft, let me explain what happens line by line 🙂
- The first line establishes a session with your tenant of choice. You’ll be prompted to enter your admin credentials: this will serve the double purpose of a) authenticate you and b) establish which directory tenant you want to work on (for example: for me it was treyresearch1.onmicrosoft..com)
- The second line loads in the PowerShell session the module containing the commands you need for working with service principals. Here there are 2 caveats I’ve seen people stumble on over and over again:
- it’s MSOnlineExtended, NOT MSOnline only. If you just tab your way to parameter completion, the first instance will be MSOnline and that does NOT contain the commands you’ll need
- On Windows8 my experience is that if you don’t add the –Force parameter the import won’t succeed. My colleagues tell me that you should not need it, but for the time being things won’t work for me on WIndows8 without it. YMMV.
- In this line I create an object of type MsolServicePrincipalAddresses with the return URL root of the target ACS namespace, which will be used as parameter in the subsequent line. It just seems cleaner to do it in its own line rather than cramming everything in the service principal creation command
- This is finally the command we wanted to execute, the creation of the service principal. Here I added the bare minimum in order to obtain a service principal viable for this walkthrough purposes, all the omitted parameters will simply be assigned default or (in the case of GUIDs) randomly initialized values. The most important value here is the one in ServicePrincipalNames, which will be used as realm (hence as AudienceRestriction) in the tokens issued on behalf of the directory tenant to the ACS namespace
That’s it; you can close the PowerShell prompt.
5. Provision the directory tenant as an IdP in the ACS namespace
This is one of my favorite parts: it’s REALLY easy :-).
Head to the identity providers section of the ACS management portal (you’ll find it at https://lefederateur.accesscontrol.windows.net/v2/mgmt/web/IdentityProvider modulo namespace name of course), hit Add, choose “WS-Federation identity provider” and click the Next button.
Type in Display name and Login link text whatever moniker you want to sue for the directory tenant as identity provider (the name of the organization is usually a good candidate). Then paste in the URL field of the WS-Federation metadata section the URL of the metadata document of the directory tenant. With the name improvements we introduced in this dev preview refresh, it is in the very convenient format https://accounts.accesscontrol.windows.net/treyresearch1.onmicrosoft.com/FederationMetadata/2007-06/FederationMetadata.xml where treyresearch1.onmicrosoft.com is the domain associated to the directory tenant.
Scroll to the bottom of the page, hit save and you’re all set.
6. Create an MVC app
Let’s jump off the cloud for few minutes, and hit the good ol’ (not really, we barely just released :-)) Visual Studio 2012 to create our test application.
You can really use any Web application template, but I would suggest using MVC4 as that will allow you to get some work done automatically for you by the identity and access tools. The internet or intranet templates will work just as well, just be aware of the fact that they both have some authentication-related logic out of the box that will become dead code once we outsource authentication to ACS. Here I’ll go with the intranet template.
7. Use the VS2012 Identity & Access tools for connecting the app to the ACS namespace
What do you mean with “I don’t have the Identity and Access Tools for Visual Studio 2012 installed on my machine”? Drop everything you are doing and go get them! 🙂 Jokes aside, they’ll make things SO much easier in this tutorial: you’ll need those installed if you want to follow step by step.
Right click on the project in the Solution Explorer and choose “Identity and Access…”. The tools dialog will open on the Providers tab. Hit the “Use the Windows Azure Access Control Service” option. Assuming that you configured the tools to connect with your target ACS namespace, you’ll see something like the following:
Check both boxes and hit OK: the tool will create one entry for your application in the ACS namespace, and will add to your web.config the necessary WIF settings for redirecting all unauthenticated requests to ACS.
At this point you could refine things further: for example, you could use the Identity and Access tools for creating an authentication experience that would help your users to choose between Facebook and Trey Research directly in your app, giving you control on the look & feel and presentation aspects of the experience. Here for simplicity I’ll just rely on the barebones-but-functional home realm discover experience hosted by ACS itself; if you want more control on the experience please refer on the flow described here right after the release notes.
8. Modify the rule group in ACS
There is one last detail we should take care of before hitting F5.
As part of the provisioning of the current application as an RP in the ACS namespace, the Identity and Access Tool creates a rule group which copies all the incoming claims from the two IPs to the output token. This works great for Facebook and the MVC template: MVC uses the Name property of the Identity in the current thread to greet the authenticated user, and one of the claim types issued via Facebook nicely maps to that property.
Things are less straightforward with the claims coming from the directory tenant: in this developer preview a directory tenant won’t emit a claim of type http://schemas.xmlsoap.org/ws/2005/05/identity/claims/name, which (absent explicit mapping in the web.config, a story for another post) means that the Name property will be empty: the user will be greeted by an “Hello, “ and that blank might be puzzling to the user. Luckily there are multiple places in the pipeline in which we can inject corrective logic: here I’ll show you how to do by creating a custom rule in ACS.
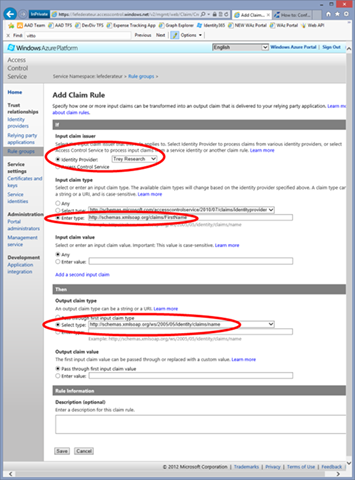
Navigate to the rule groups editor in the portal (https://lefederateur.accesscontrol.windows.net/v2/mgmt/web/RuleGroup) and select the rule group that the tool generated for you (typically of the form <AppName><N>_RuleGroup). You’ll see that you already have two rules, one for Facebook and one for Trey Research, passing all claims thru. Click Add: you’ll land on a page that will allow you to define a new claim transformation rule.
We want to pick one claim type that the directory tenant does issue, possibly one that can be used for referring to the user in the sentence “Hello, <claimvalue>”, and make ACS issue one claim with the same value but type http://schemas.xmlsoap.org/ws/2005/05/identity/claims/name.
·From the top: choose “Trey Research” in the Identity Provider dropdown.
Unfortunately the portal won’t be of much help for selecting which input claim type we should use: the metadata document of the directory tenant does not declare all the claims it issues. You can easily find out by adding a breakpoint in your app and, once authenticated, inspecting the content of ClaimsPrincipal.Current.Claims. I could give you the complete list here, but that list WILL change before GA hence I don’t want to deceive future visitors coming from search engines with a list that I already know will be obsolete.
For the time being just take as an article of faith that a directory tenant will issue a claim of type http://schemas.xmlsoap.org/claims/FirstName; that seems an acceptable value for our purposes, let’s paste that URI in the Enter Type text field. You can keep the Input claim value section to its default (any).
On the Output claim type section, select http://schemas.xmlsoap.org/ws/2005/05/identity/claims/name from the dropdown. Leave everything as is, and hit Save on the bottom of the page.
9. Test the solution
Ready to give the solution a spin? Go back to Visual Studio and hit F5.
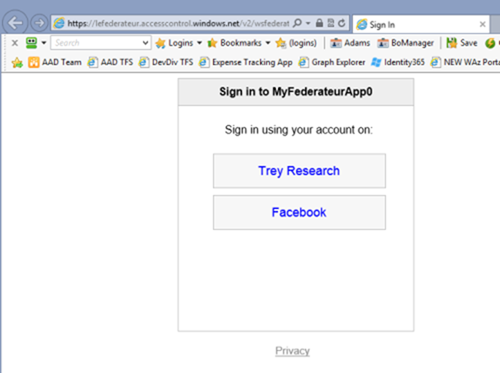
You’ll be instantly redirected to the home realm discovery page on ACS, were you’ll be offered to choose between Trey Research and Facebook.
If you choose Facebook you’ll go through the usual authentication-consent-login flow; Here I’ll pick Trey Research.
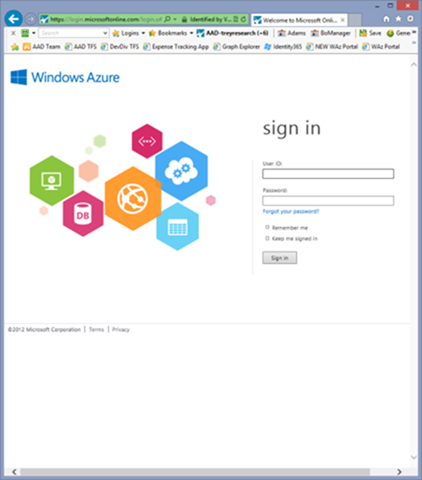
As expected, the Windows Azure Active Directory log in page shows up in all its colorful glory. Enter your credentials and…
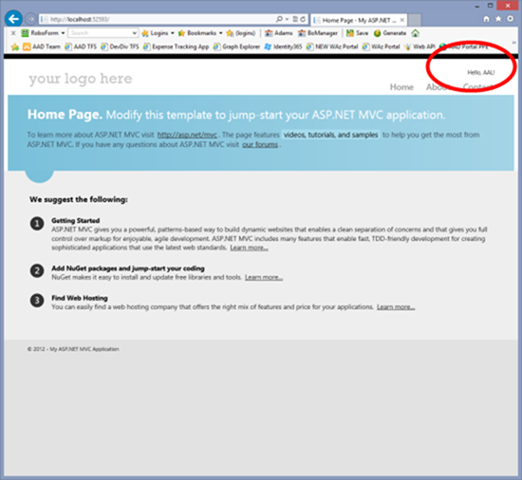
…you’re in!
Congratulations. You just signed in a Web application secured via ACS using organizational credentials from a directory tenant.
In Summary
With the latest update of the developer preview of Windows Azure Active Directory, you are now able to provision Windows Azure AD directory tenants as identity providers in ACS namespaces. This allows you to easily support in the same application organizational identities, individual identities from well-known Web providers (Microsoft account, Facebook, Google, Yahoo!, any OpenID 2.0 provider supporting attribute exchange) and direct, un-brokered federation relationships.
Conceptually, the process of onboarding a directory tenant does not deviate from the sequence of tasks you would follow for provisioning any other authority in a federation provider-identity providers topology: tell the identity provider about ACS, tell ACS about the identity provider, adjust rules to handle the occasional impedance mismatch between what the application wants and what the provider can provide, and so on. Concretely, there are still few places where you need to do a bit of extra work to make the ends meet: as we get closer to GA, hopefully things will get simpler and more streamlined.
In fact, we need your feedback! The developer preview is here for you to experiment and let us know what works and what doesn’t: looking forward to hear your impressions!



What should I make of the puid claim issued by o365 and azure active directory tenants that I’ve enabled as identity providers in my acs namespace federation provider setups? Is it a unique value that will stay the same regardless of name changes similar to old passport [ -> liveId – > microsoft account ] puids?
Hi,
Do you have example for Claim Rules that returns Security Groups from Office365 and OrganizationName?
Thanks,
Ratko
Hi Ratko,
you cannot get those info via ACS rules: however you can try the approach described in https://www.cloudidentity.com/blog/2013/01/22/group-amp-role-claims-use-the-graph-api-to-get-back-isinrole-and-authorize-in-windows-azure-ad-apps/
HTH
V.
Thanks Vibro! It would be nice to have more attributes directly in the claims. Is this Azure AD limitation?