Using ACS in Metro Style Applications
I am sure that many of you, amazed by the fantastic news about the Windows Developer Preview capabilities, wondered if it will be possible to take advantage of ACS even from Metro Style applications.
The answer is “yes, absolutely”. ![]()
We’ve been working with the appropriate Windows engineering team to make sure we connect to ACS from Metro style applications by making proper use of the new Windows security features: today we are sharing with you some of the outcomes of that conversation.
More precisely:
- If you are at //BUILD, or were watching the keynote in streaming, you just saw a Metro Style app taking advantage of ACS
- Today my formidable ex-colleagues in DPE are releasing the Windows Azure Toolkit for Windows 8 which, among other super-cool things, features an ACS sample which demonstrates the same flow shown in the keynote
- Tomorrow at 2:30pm I’ll dig deeper in the scenario here at //BUILD
Below I’ll add some details on the first two items.
Please keep in mind at all times that, in line with what you heard these days, what we are sharing on this topic is a developer preview.
John Shewchuk’s Demo in Today’s //BUILD Keynote
If you weren’t following the keynote, or if you were spacing out right at the crucial moment, here there’s a brief summary of what John demonstrated today (minus the notification parts, I am focusing just on authentication here). The demo John showed is a version of the app I built with the help of the Windows guys: Wade made a great job in polishing it and inserting in a realistic scenario, turning the rough developer-oriented prototype in a nice looking demo. In my session on Thursday you are going to see things in details.
I don’t want to spoil the simplicity of the scenario by hitting you with the explanation of what’s going on behind the scenes; not yet. I’ll get to that in a moment.
The application is a very simple travel management utility, with the typical look of the Metro Style app:
If you hit the login button, you’ll be prompted to sign in by choosing among four well-known identity providers.
Let’s pick Facebook: the familiar Facebook authentication UI appears in what looks like a dialog.
Upon successful authentication the application lets you in and retrieves your data.
Simple, right? But there’s more.
If the application ran on a trusted device, and you logged on the machine using Windows Live ID, you are in for a nice surprise. If you launch the travel application on another trusted device, you won’t have to go through the authentication phase again; you will find that you are already logged in!
Now that you saw how the user experience unfolds, let’s take a quick pick under the hood.
The App
The application is Metro style app based on HTML. All the code running on the client site is Javascript. And in Javascript tradition, it is extremely simple.
The Identity Providers
The list of identity providers displayed at sign in time is, surprise surprise, retrieved from ACS. As many of you loyal readers know by now, ACS offers the list of configured identity providers (and their sign-in URLs) in form of a JSON list. And how hard is it to retrieve a JSON list via Javascript? Thought so.
function SignIn() {

    try {

        Show('signon-block');
        var request = new XMLHttpRequest();
        request.open("GET", IPSFeedURL("https://xxxxxxxxxxx.accesscontrol.windows.net"), false);
        request.send(null);
        var jsonString = request.responseText;
        var jsonlist = ParseIPList(jsonString);

        BindJsonToList(jsonlist);
        // result

    } catch (e) {
        ShowDialog(e);
    }
}
Web Authentication Experience in a Metro Style App
The dialog which displayed the Facebook authentication UI is part of a new Windows runtime feature. I don’t want to go too much in details, as I am sure that the Windows guys will talk at length about it and they are THE authoritative source of information about their feature. Here I’ll stick to the talking points they gave me: the WebAuthenticationBroker is a surface that developers can use to host authentication experiences for online services, just like the demo did for Facebook (and would have done for any other provider, had we picked a different one).
function ItemSelected(element) {

    try {
        var acsURL = ipList[element.detail.itemIndex].LoginUrl;

        var startURI = new Windows.Foundation.Uri(acsURL);
        var endURI = new Windows.Foundation.Uri(callbackURL);

        Windows.Security.Authentication.Web.WebAuthenticationBroker.authenticateAsync(
            Windows.Security.Authentication.Web.WebAuthenticationOptions.n,
            startURI,
            endURI).then(callbackACSAuth, callbackACSAuthError);

    } catch (e) {
        ShowDialog(e);
    }
}
Invoking a Service With OAuth
Upon successful authentication, the flow bounces from Facebook to ACS, where a slim, RESTful SWT token is minted. The token is returned from the broker to the application (more about how that happens in the section about the toolkit). The token is then used for securing an OAuth 2.0 call to a service on the travel app backend (on Windows Azure of course, but technically it could live anywhere). The operation in itself is absolutely trivial to implement in Javascript, it’s just a matter of putting the token in the authorization HTTP header according to the OAuth2.0 syntax.
function GetTravelerInfo(token, serviceUrl) {
    try {
        var authHeader = "OAuth " + token;
        var request = new XMLHttpRequest();
        request.open("GET", serviceUrl, false);
        request.setRequestHeader("Authorization", authHeader);

        request.send();

        return request.responseText;

    } catch (e) {
        ShowDialog(e);
    }
}
The token validation on the service side is done via WIF, but given the simplicity of the operation it could be done even directly in the app code.
Roaming Tokens
This is all fine and dandy, I can almost hear you say: but how did you pull off the trick of avoiding the need to re-authenticate on the other device? The answer lies in another great new feature of Windows, the Credentials Vault. The considerations I made earlier about the WebAuthenticationBroker are valid for the Vault, too: in fact, it is coming from the same awesome Windows feature team.
Here I will just say that, as you have seen in the keynote and big picture sessions, Windows is introducing phenomenal new roaming capabilities: if you save your tokens in the Vault, and the correct conditions are met, you can take advantage of those roaming capabilities too.
//saving the token in the Vault
            var vault = new Windows.Security.Credentials.PasswordVault();
            var cred = new Windows.Security.Credentials.PasswordCredential(
                url,
                username,
                token);
            vault.add(cred);
Now, that was quite the whirlwind tour! Don’t get fooled by the length of the post, that is due to the fact that there are so many new things to describe. In fact, I keep being amazed by how little, non-esoteric code all this requires on the client side when you develop Metro Style apps.
What’s that? You want to try it by yourself? Keep reading, then!
The ACS Sample in the Windows Azure Toolkit for Windows 8
Want to take advantage from the Windows Developer Preview of the Windows Azure services you already know and love? Want to learn more about the new Windows Push Notification Services?
Then download the Windows Developer Preview, install it and get yourself a copy of the Windows Azure Toolkit for Windows 8.
The Windows Azure Toolkit for Windows 8 contains a sample ACS application which demonstrates the same flow described earlier for the keynote demo. The notable differences are that the UI is much less fancy (but still metro style!) and the backend is designed to run on the local Windows Azure simulation environment, which makes it especially handy.
In this post I won’t drill too deep in the code, that’s for a future installment (or, if you are at //BUILD and you are interested, come by on Thursday). For now I just want to give you few tips for finding your way through the sample and run it successfully.
Setup
Install the Windows Developer Preview; download the Windows Azure Toolkit for Windows 8 and launch it. That’s all you need to do. The (metaphorically) award-winning Dependency Checker takes care of tracking down everything you need and offer you the right links for downloading/installing it. In fact, I used it for getting Visual Studio 2010 installed and configured side by side with the IDE out-of-the-box in this preview, Visual Studio 2011 Express.
Few suggestions:
- Some of the entries in the dependency checker can take a long time. Be patient when
- downloading & installing WebPI (if you don’t have it already)
- enabling the Internet Information Services 7 (IIS7) feature
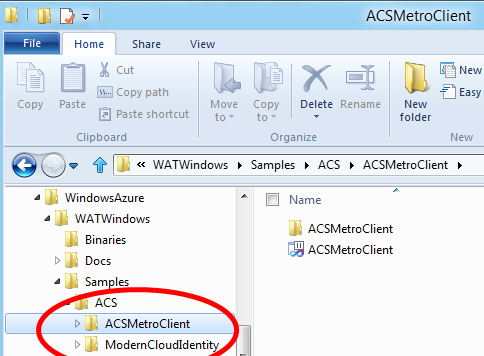
- The ACS sample is in c:WindowsAzureWATWindowsSamplesACS.
In order to use the sample, you need to run SetupSample.cmd in the same folder. You can’t skip this, as the setup needs to adapt the code to the ACS namespace you’ll use and update the namespace itself accordingly- The setup will ask you for one ACS namespace and its management key. I suggest getting those info in advance: instructions on how to do that are in the readme of the toolkit, in Appendix II
- If you want to use Facebook, you’ll need to create one Facebook app tied to your ACS namespace; the setup will ask for the app ID and the secret. Again, I suggest getting those values in advance
The Sample
The sample includes two solutions:
- ACSMetroClient, the Metro style application
- ModernCloudIdentity, the service called by the client (and some other stuff)
The Metro style application templates are available only in Visual Studio 11; and as of today, the Windows Azure tools for Visual Studio will work only with VS 2010. This means that you need to open ACSMetroClient with VS11 and ModernCloudIdentity with VS10.
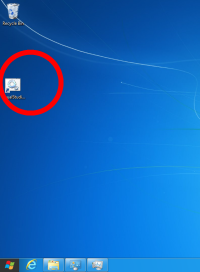
Pro tip: although you can open ACSMetroClient.sln by double-clicking it, it is suggested that you open ModernCloudIdentity.sln by first launching VS10 via the shortcut to VisualStudio2010WindowsAzure.cmd that the setup placed on your desktop, and then you open the solution from there.
The Service solution
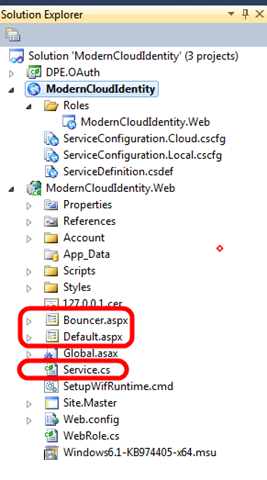
The solution contains three projects:
- DPE.OAuth, a class library containing an OAuth implementation for WIF (from the good old FabrikamShipping)
- ModernCloudIdentity, the cloud project hosting the web role for the service
- ModernCloudIdentity.Web, a web role containing the service and a a couple of utility pages (Default.aspx and Bouncer.aspx)
The service part is well known, basically the same as every REST-based sample or hands-on lab we released in the past.
The Default page here is a little trick in this sample for bridging the different ways in which ACS issues tokens in redirect scenarios (in a POST) and the WebAuthenticationBroker expects them (in the querystring of the Url that has been defined as callback). As I mentioned I don’t want to go in details here. I’ll just say that when Default.aspx receives the SWT token from ACS in a classic wresult POST , it extracts the token and adds it in the querystring of a redirect to Bouncer.aspx; but Bouncer.aspx is the designated callback URL, hence the broker retrieves the token from the querystring and returns. More complicated to explain than to do; and in any case, please keep in mind that this is just a sample based on developer preview software.
Hit F5 to start the simulation environment: you’ll get a couple of browsers complaining that you didn’t send a token, don’t mind them and move to the client solution.
The Metro Style client
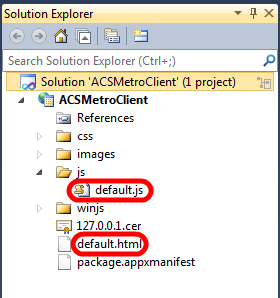
The client code is really straightforward. It is basically the default app as it comes out of the template, with just few modifications to default.html and default.js:
- The UI is really a series of DIVs, which are made visible or invisible depending on where in the app the user. There is a splash screen, a home realm discovery screen, and a service invocation UI. If you follow the flow described for the keynote demo, you’ll see them in that order. The main difference, apart from the look&feel, is that the call to the service does not happen automatically right after the authentication experience but takes place when you click on “Invoke”. Note that the token text is available on the page, so that you can experiment with tampering with the string before sending it and get an “invalid signature” on purpose.
If there is already a token in the vault from former sessions, the app will skip the authentication and go straight to the invoke screen. - The JS contains the logic for moving thru the app, getting the list of IPs and presenting it to the user (databinding is fun! Thanks Giorgio and Jaime for all your help on that), using the WebAuthenticationBroker, the Vault, and performing calls. As mentioned, I won’t go in details yet: we’ll get to this in tomorrow’s session.
Exciting times!
Among all the great news of the last two days, it’s nice to see that claims-based identity is the gift that keeps on giving. I just *love* to see how ACS can really simplify your life even when used with those brand-new development technologies. Looking forward for your feedback!

![clip_image001[4] clip_image001[4]](http://cloudidentity.com/blog/wp-content/uploads/2011/09/4186.clip_5F00_image0014_5F00_603844A7.png)
![clip_image002[4] clip_image002[4]](http://cloudidentity.com/blog/wp-content/uploads/2011/09/2018.clip_5F00_image0024_5F00_0AC3FFB8.png)
![clip_image003[4] clip_image003[4]](http://cloudidentity.com/blog/wp-content/uploads/2011/09/3021.clip_5F00_image0034_5F00_5A4D7B41.png)
![clip_image004[4] clip_image004[4]](http://cloudidentity.com/blog/wp-content/uploads/2011/09/1856.clip_5F00_image0044_5F00_068A0226.png)


Do you know if there’s a provided implementation for interacting directly with an oauth service from the client app? Ex. libraries that handle generating signatures, etc?
I can always grab the one up on google code, but I just wanted to double-check that it’s not built in and I just missed it.
oauth.googlecode.com/…/javascript