A Sample Windows Phone 8 App Getting Tokens from Windows Azure AD and ADFS
Few months ago I wrote a quick post to demonstrate how to get a token from Windows Azure AD in a Windows Phone 8 application. I am happy to report that many people have been successfully using that post as a starting point! However, few others didn’t manage on their own and asked for help. Given that 1:1 help is unfeasible given my narrow bandwidth, I decided to write an even simpler sample app and push it on GitHub: you can find it here.
In fact, I found it handy to have such app on my device! Hence, I am also publishing it on the Windows Phone Store ![]() .
.
This post is going to provide the help page for the app, with basic usage instructions.
Also: the code in the original post didn’t take advantage of the improvements we introduced in the meanwhile (ADFS support for OAuth2, portable HttpClient package for Windows Phone, id_token…) hence I took the chance to freshen up those parts as well – I’ll briefly discuss the code authentication logic in the appendix of the post.
IMPORTANT: This is my personal blog. This app does not represent any best practice.I am not committing to support this sample in any shape or form. I am not a Windows Phone expert, and I did not write this sample in official capacity.
How to Use the App
The application provides you a simple interface you can use to request an access token from a Windows Azure AD tenant or an ADFS W2012 R2 instance.
You can use this app to simulate requests from your own client applications, all you need to do is entering the values describing your client app and the resource you are targeting.
Basic Usage
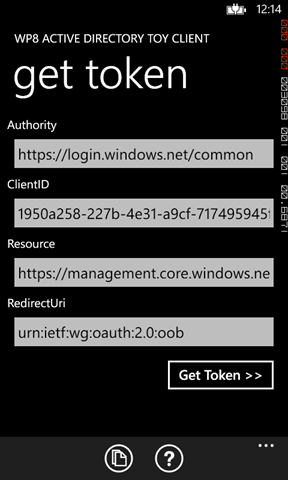
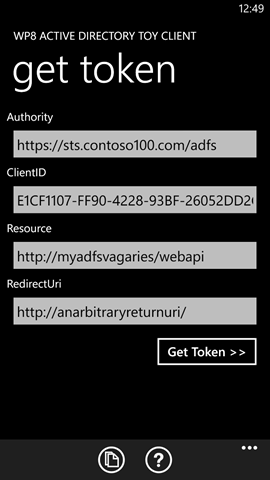
The main screen appears as in the following:
You can use the text boxes to enter all the coordinates which define the request you want to submit, and specifically:
- Authority: the Windows Azure AD tenant or ADFS instance managing the user account you want to use
- ClientID: the identifier of your client application, as configured in the authority
- Resource: the resource identifier of the web api you want a token for. Note, this app does not actually use the token with the resource – it just acquires it. See below for ways in which you can use that token outside of the app
- RedirectUri: the redirect Uri of your client application, as configured in the authority
To make things easier, the app comes preconfigured with the coordinates for testing the Windows Azure Cmdlets accessing the RDFE API. That, plus the use of the common tenant, allow you to see the app in action right away: you can use any account from your subscription.
Once you are satisfied with the values you entered (or with the defaults) click “Get Token>>”.
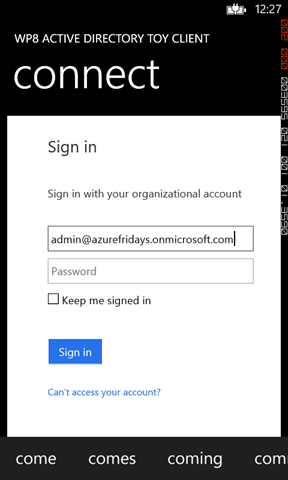
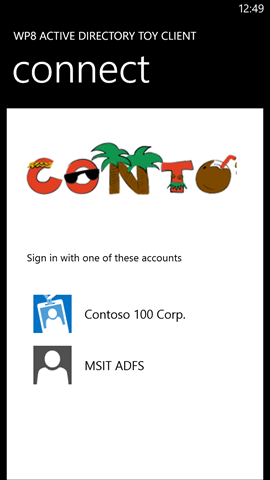
The next screen holds the familiar credential prompt of Windows Azure AD (or ADFS if that’s what you pointed to), as shown through a browser control. Enter the credentials of the account you want to use and hit sign in.
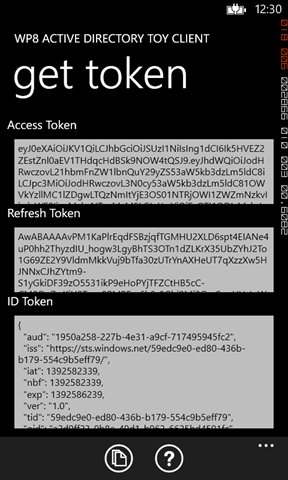
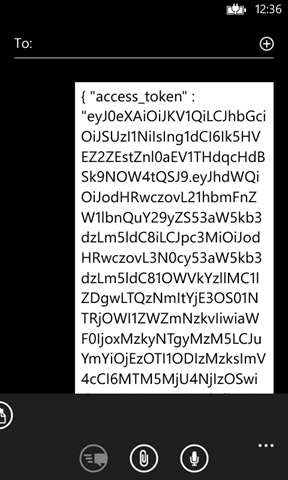
If everything goes well, you’ll see the screen above.
The access and refresh tokens are presented in their base64’ed form: you can select the text, copy and paste it wherever you want.
The id token, when present (ADFS does not issue it), is shown in human-readable form so that you can get an idea of whether the token you got is in line with what you were expecting or not.
Errors
The error management logic is barely there (remember the disclaimer!).
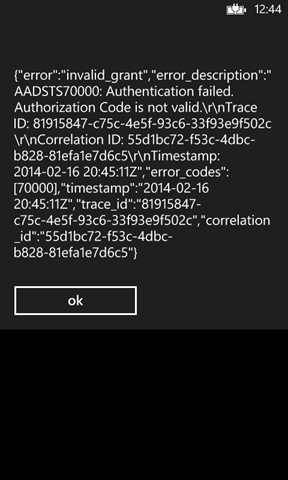
When something does not go according to plan, you’ll typically be unceremoniously presented with the dump of what we got back from the service.
After dismissing the dialog, you are brought back to the main screen so that you can correct the issue.
Copy to Clipboard
You can copy to the clipboard the entire content of the screen. Just touch the copy button on the app bar and all the values on all the visible fields will be saved in a JSON file and copied. That is useful when you want to grab one of the tokens and inject it in some sample code which hits the web API you want to target – I do it all the time for the Graph.
Note: you can also copy values of authority, clientid, etc that you plan to use frequently, so that you don’t have to type them in all the time. Just hit the copy button while on the first screen, and you’ll get all the values saved in the clipboard in the format below:
{ “authority” : “https://login.windows.net/treyresearch1.onmicrosoft.com”,”clientid” : “4a491cff-73a9-4a45-b274-b5836a723b14″,”redirecturi” : “http://whatevah”,”resource” : http://localhost:8643/}
Feeding Values Via File
Typing long values on the phone is a chore, and typing a GUID is torture. I thought how to make it easier to enter the initial coordinates, and remembered a great feature of Windows Phone apps: you can associate a file type to your app, so that whenever the user tries to open that file your app gets launched. Hence, I defined an easy file format (the same JSON dump you get when you copy values to the clipboard), registered one improbable extension (.tknrq), defined a default icon for the file format and voila’!
To demonstrate the process, I saved a couple of such files (pointing to one AAD and one ADFS), sent them as attachment to myself, and tried to open them from Outlook on the phone.
Here there’s the email with the attachment, note that given that I have the app installed the token format is recognized.
Clicking on contoso100_ADFS.tknrq we get transported to the app, which gets initialized with the corresponding values:
Just to be sure, clicking on Get Token results in the ADFS authentication page popping up.
It’s that simple! ![]()
The Token Acquisition Logic
As promised, here there’s some commentary on the token acquisition logic.
The principles remain the same ones I covered in the old post, hence I won’t go as deep.
Al the interesting stuff takes place in SignInPage.xaml.cs. That’s the place where I host the browser control for orchestrating the authorization code acquisition, and the follow up call to the token endpoint for redeeming it for actual tokens. Thanks to the platform improvements occurred in the last few months, that logic now boils down to just three methods.
// build the URL of the Authorization endpoint from the app state
// navigate to it via browser control
protected override void OnNavigatedTo(System.Windows.Navigation.NavigationEventArgs e)
{
    base.OnNavigatedTo(e);

    string authURL = string.Format(
        "{0}/oauth2/authorize?response_type=code&resource={1}&client_id={2}&redirect_uri={3}",
        app.Authority,
        app.Resource,
        app.ClientID,
        app.RedirectUri);
    //navigate to it
    myBrowser.Navigate(new Uri(authURL));
}
OnNavigatedTo retrieves the request parameters from the App properties and crafts the authorization URL. Whereas during the original post this flow was only possible with Windows Azure AD, now it’s possible with ADFS too; hence the tenantID parameter was eliminated in favor of a more comprehensive authority, which includes the hostname and can be used to represent both on-premises and cloud endpoints.
As soon as the URL is ready, the method navigates straight to it.
// watch for the redirect URI, once you see it
//    - stop navigation
//    - retrieve the authorization code
//    - hit the Token endpoint
//    - put the result back in the app state and go back to main
private async void Navigating(object sender, NavigatingEventArgs e)
{
    string returnURL = e.Uri.ToString();
    if (returnURL.StartsWith(app.RedirectUri))
    {
        string code = e.Uri.Query.Remove(0, 6);
        e.Cancel = true;
        myBrowser.Visibility = System.Windows.Visibility.Collapsed;

        app.Response = await RequestToken(code);

        Dispatcher.BeginInvoke(() =>
        {
            NavigationService.GoBack();
        });
    }
}
The Navigating event is used to watch out for requests for the RedirectUri, which signal that the code negotiation concluded. The parsing logic could be more robust, but so far it worked.
The code is fed to the RequestToken, which will redeem it. Note that the call will take place even if the code acquisition failed – some error detection at this point might save some cycles, but we’ll trap it anyway afterwards.
Once the call to RequestToken concluded, we go back to the page that called us. That page will be responsible to interpret the results saved in app.Response.
// construct the request for the Token endpoint
// hit the endpoint and return the results
private async Task<string> RequestToken(string code)
{
    HttpClient client = new HttpClient();
    HttpRequestMessage request = new HttpRequestMessage(HttpMethod.Post, string.Format("{0}/oauth2/token", app.Authority));
    string tokenreq = string.Format(
            "grant_type=authorization_code&code={0}&client_id={1}&redirect_uri={2}",
            code,
            app.ClientID,
            HttpUtility.UrlEncode(app.RedirectUri));
    request.Content = new StringContent(tokenreq, Encoding.UTF8, "application/x-www-form-urlencoded");
    HttpResponseMessage response = await client.SendAsync(request);
    string responseString = await response.Content.ReadAsStringAsync();
    return responseString;
}
RequestToken is far more compact than the original, thanks to the awesome HttpClient PCL now available on Windows Phone too.
Wrap
Well, that was a fun Saturday night!
Windows Phone is an incredibly easy platform, I was able to do advanced stuff (like associating file formats and similar) in no time. And of course, hitting OAuth2 endpoints on AD is trivial – the token lifecycle less so, once you have it you have to keep it somewhere, refresh it at the right time etc etc but this should be a robust starting point. In fact, I am actually using the app on my own devices & projects – it’s a quick way of getting test tokens to quickly try things with APIs.
Please always remember the disclaimer ![]() and have fun!
and have fun!

