Group & Role Claims: Use the Graph API to Get Back IsInRole() and [Authorize] in Windows Azure AD Apps
Welcome to a new installment of the “addressing the most common questions about Windows Azure AD development” series! This time I am going to tackle one question that I know is very pressing for many of you guys:
How do I get role and group membership claims for users signing in via Windows Azure AD?
Right now the tokens issued by Windows Azure AD in Web sign-on flows do not contain groups or role claims. In this post I will show you how to leverage the Graph API and the WIF extensibility model to work around the limitation; I will also take advantage of this opportunity to go a bit deeper in the use of the Graph API, which means that the post will be longer (and at times more abstract) than a simple code walkthrough. As usual, those are my personal musings and my own opinions. I am writing this on a Saturday night (morning?) hence I plan to have fun with this 🙂 For the ones among you who are in a hurry or have low tolerance for logorrhea, please feel free to head to the product documentation on MSDN.
Bird’s Eye View of the Solution
Most pre-claims authorization constructs in ASP.NET are based on the idea of roles baked in IPrincipal: namely, I am thinking of the <authorization> config element, the [Authorize] attribute and of course the IsInRole() method. There’s an enormous amount of existing code based on those primitives, and abundant literature using those as the backbone of authorization enforcement in .NET applications.
This state of affair was well known to the designer of the original WIF 1.0, who provided mechanisms for projecting claims with the appropriate semantic (and specifically http://schemas.microsoft.com/ws/2008/06/identity/claims/role) as roles in IPrincipal. We even have a mechanism which allows you to specify in config a different, arbitrary claim type to be interpreted as role, should your STS use a different claim type to express roles.
As mentioned in the opening, right now Windows Azure AD does not send anything that can be interpreted as a role claim. The good news, however, is that Windows Azure AD offers the Graph API, a complete API for querying the directory and retrieve any information stored there, for any user; that includes the signed-in user, of course, and the roles he/she belongs to. If you need to know what roles your user is in, all you need to do (over-simplifying a bit, for now) is to perform a GET on a resource of the form https://graph.windows.net/yourtenant.onmicrosoft.com/Users(‘guido@yourtenantname.onmicrosoft.com’)/MemberOf. That is pretty sweet, and in fact is just a ridiculously tiny sliver of all the great things you can do with the Graph API; however, if you’d do this from your application code that would not help you to leverage the user’s role information from <authorization> and the like. When you are in your application’s code is kind of too late, as the ClaimsPrincipal representing the caller has already been assembled and that’s where the info should be for those lower-level mechanisms to kick in. True, you could do something to the ClaimsPrincipal retroactively, but that’s kind of brittle and messy.
There is another solution here, which can save both goat and cabbage (can you really say this in English?:-)). The WIF processing pipeline offers plenty of opportunities for you to insert custom logic for influencing how the token validation and ClaimsPrincipal creation takes place: details in Chapter 3 of Programming WIF. Namely, there is one processing stage that is dedicated to incoming claims processing. Say that you have logic for filtering incoming claims, modifying them or extending the claims set you are getting from the STS with data from other sources. All you need to do is to derive from the ClaimsAuthenticationManager class, override the Authenticate method and add a reference to your custom class in the application’s config.
So, the solution I propose is simple: we can create a custom ClaimsAuthenticationManager that at sign-in time reaches back to the Graph, retrieves the roles information, creates roles claims accordingly and adds them to the ClaimsPrincipal. Everything else downstream from that will be able to see the roles information just like if they would have been originally issued by the STS.
The code of custom ClaimsAuthenticationManager is going to be pretty simple, also thanks to the use of AAL for obtaining the necessary access token: just a tad more than 30 lines, and most of it string manipulation. In my experience, the thing that people often find tricky is the work that is necessary for enabling your Web application to invoke the Graph; furthermore, even if AAL reduces to a mere 3 the lines of code necessary for obtaining an access token, the structure of the parameters you need to pass is not always immediately clear to everybody. Here I’ll do my best to explain both: they are not especially hard and I am confident you’ll grok it right away. That said, I do hope we’ll manage to automate A LOT of this so that in the future you won’t be exposed to this complexity unless you want to change the defaults. We kind of already do this for the Web SSO part, if you use the MVC tool you can get a functioning MVC4 app which uses Windows Azure AD for Web SSO in no time. In fact, in this post I’ll use such an app as starting point.
Ready? Let’s dive.
Prepping the GraphClaimsAuthenticationManager Wireframe
Let’s get this immediately out of the way; also, it will provide structure for the rest of the work.
As mentioned, I assume you already have an MVC4 app that you configured with the MVC tool to integrate with your Windows Azure AD tenant for sign-in. If you didn’t do it yet, please head to this page now and follow the instructions for configuring your application. You can skip the publication to Windows Azure Web Sites, for this post we’ll be able to do everything on the local box. If you want to see the tool in action, check out this BUILD talk.
Create a new class library (though you could just add a class to your web project) and call it something meaningful: I called mine GraphClaimsAuthenticationManager.
Add a reference to System.IdentityModel, rename the class1.cs file to GraphClaimsAuthenticationManager.cs, then change the code as follows:
1: public class GraphClaimsAuthenticationManager : ClaimsAuthenticationManager
2: {
3: public override ClaimsPrincipal
Authenticate(string resourceName, ClaimsPrincipal incomingPrincipal)
4: {
5: if (incomingPrincipal != null &&
incomingPrincipal.Identity.IsAuthenticated == true)
6: {
7: // get a token for calling the Graph
8:
9: // query the Graph for the current user's memberships
10:
11: // add a role claim for every membership found
12:
13: }
14: return incomingPrincipal;
15: }
16: }
This is pretty much the default ClaimsAuthenticationManager implementation: it passes through all the incoming claims to the next stage undisturbed. Our job will be to fill in the method’s body following the comment placeholders I wrote there. You can make your application pick up and execute your class by adding a reference to the class library project and inseriting the proper config element to the web.config, as shown below (sci-fi formatting, you would not break strings IRL).
 <system.identityModel>
    <identityConfiguration>
      <claimsAuthenticationManager
        type="GraphClaimsAuthenticationManager.GraphClaimsAuthenticationManager,
              GraphClaimsAuthenticationManager" />
I’d suggest hitting F5 and see if everything still works, often something silly like misspelled namespaces in the type attribute will create stumble points and you want to catch that before there will be more moving parts later on.
Enabling An MVC App to Invoke the Graph API
Alrighty, now for the first interesting part.
The next thing we need to do is enabling your MVC application to call back into the Graph and inquiry about the user’s roles. But in order to do that, we first need to understand how our MVC application is represented in Windows Azure AD and what do we need to change.
When you run the MVC tool for enabling Windows Azure authentication you are basically getting lots of the steps I described here done for you. As a quick recap, the tool
- asks you which directory tenant you want to work with
- gathers your admin credentials and uses them to get an access token for the Graph API
- Invokes the Graph to create a new ServicePrincipal representing your MVC app. It does so by generating a new random GUID as identifier, assigning your local IIS express and project address as return URL, and so on
- Reaches out for the WS-Federation metadata document of the tenant you have chosen, and uses it to generate the necessary WIF settings to configure your app for Windows Azure SSO with the tenant of choice
…and that’s what enables you to hit F5 right after the wizard and see the SSO flow unfold in front of your very eyes, without the need of writing any code. Veeery nice.
Now, from the above you might be tempted to think that a ServicePrincipal is the equivalent of a RP role in ACS: an entry which represents an entity meant to be a token recipient. In fact, a ServicePrincipal can represent more roles than a simple RP: for example, an ServicePrincipal can also represent an applicative identity, with its own associated credential, whihc can be used for obtaining a token to be used somewhere else. Remember ACS’ service identities? That’s kind of the same thing.
I guess you are starting to figure out what’s the plan here. We want to use the app’s ServicePrincipal credentials (in trusted subsystem fashion) to obtain a token for calling the Graph. That’s a fine plan, but it cannot be implemented without a bit more work. Namely:
- The MVC tool does not do anything the ServicePrincipal’s credentials. We must get to know them, and the only way after creation is to assign new ones. We’ll do that by updating the existing ServicePrincipal via cmdlets
- Calling the Graph is a privilege reserved only to entities belonging to well known roles: Company Administrators for read/write Directory Readers for read-only access. Needless to say, the ServicePrincipal created by the MVC tool belongs to neither. We’ll use the cmdlets here as well to add the app’s ServicePrincipal to the Directory Readers role.
Luckily it’s all pretty straightforward. The first thing we need to do is to retrieve a valid identifier for the ServicePrincipal, so that we can get a hold on it and modify it. That is pretty easy to do. Go to the app’s web.config, in the <system.identityModel> sections, and you’ll find the AppPrincipalId GUID in multiple places: in the identityConfiguration/audienceUris or in the realm property of the system.identityModel.services/federationConfiguration/wsFederation element. Put it in the clipboard (without the “SPN:”!) and open the O365 PowerShell cmdlets prompt. Then, consider the following script. The formatting is all broken, of course: keep an eye on the line numbers for understanding where the actual line breaks are.
1: Connect-MsolService
2: Import-Module msonlineextended -Force
3: $AppPrincipalId = '62b4b0eb-ef3e-4c28-7777-2c7777776593'
4: $servicePrincipal =
(Get-MsolServicePrincipal -AppPrincipalId $AppPrincipalId)
5: Add-MsolRoleMember -RoleMemberType "ServicePrincipal"
-RoleName "Directory Readers"
-RoleMemberObjectId $servicePrincipal.ObjectId
6:
7: $timeNow = Get-Date
8: $expiryTime = $timeNow.AddYears(1)
9: New-MsolServicePrincipalCredential
-AppPrincipalId $AppPrincipalId
-Type symmetric
-StartDate $timeNow
-EndDate $expiryTime
-Usage Verify
-Value AAAAAAAAAAAAAAAAAAAAAAAAAAAAAAAAAAAAAAA/Q8=
Line by line:
Line 1: connect to the tenant. You’ll be prompted for your admin user, make sure you choose the same tenant you have used to configure the MVC app 🙂
Line 2: it imports the O365 cmdlets, and specifically the ones about ServicePrincipals. The “force” flag is mandatory on Win8 boxes.
Line 3: I assign the AppPrincipalId from the web.config so I don’t have to paste it every time.
Line 4: retrieve the ServicePrincipal
Line 5: add it to the “Directory Readers” role
Lines 7 and 8: get the current date and the date one year from now, to establish the valitity bopundaries of the credentials we are going to assign to the ServicePrincipal
Line 9: create a new ServicePrincipalCredential of type symmetric key (there are other flavors, like certificate based creds) and assign it to the app’s ServicePrincipal
Simple, right? Well, I have to thank Mugdha Kulkarni from the Graph team for this script. She wrote it for me while I was prepping for the BUILD talk, though in the end I decided I didn’t have enough time to show it on stage. Thank you Mugdha, told you this was going to come in handy! 😉
Anyway, we’ve done our first task: our app has now the right to invoke the Graph. Let’s get back to the GraphClaimsAuthenticationManager and write some code to exercise that right.
Using AAL to Obtain an Access Token for the Graph API
Get back to VS and paste the following at the beginning of the if block in the Authenticate method:
1: string appPrincipalID = "62b4b0eb-ef3e-4c28-7777-2c7777776593";
2: string appKey = "AAAAAAAAAAAAAAAAAAAAAAAAAAAA/Q8=";
3:
4: string upn = incomingPrincipal.FindFirst(
"http://schemas.xmlsoap.org/ws/2005/05/identity/claims/upn").Value;
5: string tenantID = incomingPrincipal.FindFirst(
"http://schemas.microsoft.com/ws/2012/10/identity/claims/tenantid").Value;
That is pretty scrappy code, I’ll readily admit. The first 2 lines hold the app’s ServicePrincipal id and key, respectively. I could have retrieved it from the config, but if I do everything how are you going to have fun? 😉
The next 2 lines retrieve the UPN of the incoming user (“username@domain”) and the ID of the directory tenant from where he/she is coming from, both very important values for crafting our query.
| VERY IMPORTANT especially for you Observers landing on this post from the future (aren’t you sad that Fringe ended? Luckily the finale wasn’t terrible).
The claims used above are the claims from Windows Azure AD available TODAY. Those claims are very likely to change, hence the above will no longer be valid either because the claim types will no longer be there or more appropriate alternatives will emerge. |
Next, we are going to inject the ServicePrincipal credentials in AAL and obtain a token for calling the Graph. As mentioned, this requires just few lines but the parameters are a bit arcane. Bear with me as I walk you though their function and meaning. Also, don’t forget to add a reference to the AAL NuGet and associated using! You can do that by right-clicking on the GraphClaimsAuthenticaitonManager in solution explorer, choose Manage NuGet Packages, search for AAL and reference the result.
1: // get a token for calling the graph
2: AuthenticationContext _authContext =
new AuthenticationContext(
string.Format(https://accounts.accesscontrol.windows.net/{0},
tenantID));
3: SymmetricKeyCredential credential =
new SymmetricKeyCredential(
string.Format("{0}@{1}",appPrincipalID,tenantID),
Convert.FromBase64String(appKey));
4: AssertionCredential _assertionCredential =
_authContext.AcquireToken(
string.Format(00000002-0000-0000-c000-000000000000/graph.windows.net@{0},
tenantID),
credential);
5: string authHeader = _assertionCredential.CreateAuthorizationHeader();
OK. Ready?
Line 2: we begin by initializing AuthenticationContext to the Windows Azure AD tenant we want to work with. We’ll use the AuthenticationContext for accessing from our code the features that Windows Azure AD offers. In order to do that, we simply pass the path of the Windows Azure AD tenant we want to work with.
Line 3: we create a representation of the app’s ServicePrincipal credentials, as an instance of the class SymmetricCredential. We do that by combining its symmetric key the ServicePrincipal name, obtained by combining the ServicePrincipal GUID (used as ServicePrincipalAppID in the cmdlet earlier) and the ID of the current tenant. The reason for which we need both the AppPrincipalId and the Tenant ID is that we want to make sure we specify we are referring to THIS principal in THIS tenant. If our app would be a multitenant app, designed to work with multiple AAD tenants, the same AppPrinciplaId would be (possibly) used across multiple tenants. we’d need to ensure we are getting a token for the right tenant, hence we qualify the name accordingly: appprincipalid@tenant1, appprincipalid@tenant2 and so on. Here we are working on a single tenant hence there is no ambiguity, but we have to use that format anyway
Line 4: we ask to the AuthenticationContext (hence to the directory tenant) to issue an access token for the Graph.
We need to prove who we are, hence we pass the credentials. Also, we need to specify for which resource we are asking a token for, hence the string.Format clause in the call. You see, the Graph is in itself a resource; and just like your app, it is represented with a ServicePrincipal. The string 00000002-0000-0000-c000-000000000000 happens to be its AppPrincipalId, and graph.windows.net is the hostname; qualify the two with the target tenantID and you’ get the Graph ServicePrincipal name.Line 5: with this line we retrieve (from the results of the call to AcquireToken) the string containing the access token we need to call the Graph . The CreateAuthorizationHeader will simply put it in the form “Bearer <token>” for us, less work when we’ll put it in the HTTP header for the call.
Getting the Memberships and Enriching the Claims Collection of the Current Principal
A last effort and we’ll be done with our GraphClaimsAuthenticationManager! I’ll just put all the code there and intertwine the explanation of what’s going on in the description of every line. Paste the code below right after the AAL code just described, still within the if block of the Authenticate method.
1: // query the Graph for the current user's memberships
2: string requestUrl =
string.Format(https://graph.windows.net/{0}/Users('{1}')/MemberOf,
tenantID, upn);
3: HttpWebRequest webRequest =
WebRequest.Create(requestUrl) as HttpWebRequest;
4: webRequest.Method = "GET";
5: webRequest.Headers["Authorization"] = authHeader;
6: webRequest.Headers["x-ms-dirapi-data-contract-version"] = "0.8";
7: string jsonText;
8: var httpResponse = (HttpWebResponse)webRequest.GetResponse();
9: using (var streamReader =
new StreamReader(httpResponse.GetResponseStream()))
10: {
11: jsonText = streamReader.ReadToEnd();
12: }
13: JObject jsonResponse = JObject.Parse(jsonText);
14: var roles =
15: from r in jsonResponse["d"]["results"].Children()
16: select (string)r["DisplayName"];
17:
18: // add a role claim for every membership found
19: foreach(string s in roles)
20: ((ClaimsIdentity)incomingPrincipal.Identity).AddClaim(
new Claim(ClaimTypes.Role, s, ClaimValueTypes.String, "GRAPH"));
Line 1: we craft the URL representing the resource we want to obtain. We are using the OData query syntax, which happens to be very intuitive. I’ll break this query down for you. Note that every element builds on its predecessors,
| https://graph.windows.net/ | This indicates the Windows Azure feature we want to access. In this case, it is the Graph API: if we would have wanted to access a token issuing endpoint, or a metadata document, we would have used a different URL accordingly |
| {tenantID} | This indicates which AAD tenant we want to query. Here I am using tenantID (a GUID) because it is pretty handy, i received it with the incoming claims; howeve I could have used the tenant domain (the cloud-managed ones are of the form ‘tenantname.onmicrosoft.com’) just as well |
| /Users | /Users indicate the entity I want to GET. If I’d stop the query here, I’d get a collection of all the users in the tenant |
| (‘{upn}’) | adding this element filters the users’ list to select a specific entry, the one of the user that matches the corresponding UPN. Once again, the UPN is not the only way of identifying a user. Every entity in the directory has its (GUID) identifier, and if I would have access to it (the web sign on token did not carry it, but I could have gotten it as the result of a former query) I could use it as search key. In fact, that would even be more robust given that the UPN is non-immutable… though it is quite unlikely that a UPN would get reassigned during your session :-). If we’d stop the query here, we’d get back a representation of the user matching our search key |
| /MemberOf | assuming that the query so far produced a user: /MemberOf returns all the roles and security groups the user belongs to. |
Lines 3 and 4: standard HttpWebRequest initialization code. I guess I’ll have to start using HttpClient soon, or Daniel will stop greeting me in the hallways 😉
Line 5: we add the header with the access token we obtained earlier.
Line 6: we add a well-known header, which specifies the version of the API we want to work with. This header is MANDATORY, no version no party.
Line 7 to 12: standard request execution and deserialization of the response stream into a string. We expect this string to be filled with JSON containing the answer to our query.
We didn’t finish the tutorial yet, hence at this point we should not be able to see what we are going to get a s a result, but I am going to cheat a little and give you a peek of a typical result of that query:
1: {
2: "d": {
3: "results": [
4: {
5: "__metadata": {
6: "id": "https://graph.windows.net/929bfe53-8d2d-4d9e-a94d-dd3c121183b4/DirectoryObjects('Group_ce134d80-fa89-425a-8eb6-d64429b0ba58')",
7: "uri": "https://graph.windows.net/929bfe53-8d2d-4d9e-a94d-dd3c121183b4/DirectoryObjects('Group_ce134d80-fa89-425a-8eb6-d64429b0ba58')/Microsoft.WindowsAzure.ActiveDirectory.ReferencedObject",
8: "type": "Microsoft.WindowsAzure.ActiveDirectory.ReferencedObject"
9: },
10: "ObjectId": "ce134d80-fa89-425a-8eb6-d64429b0ba58",
11: "ObjectReference": "Group_ce134d80-fa89-425a-8eb6-d64429b0ba58",
12: "ObjectType": "Group",
13: "DisplayName": "Sales",
14: "Mail": null
15: },
16: {
17: "__metadata": {
18: "id": "https://graph.windows.net/929bfe53-8d2d-4d9e-a94d-dd3c121183b4/DirectoryObjects('Role_fe930be7-5e62-47db-91af-98c3a49a38b1')",
19: "uri": "https://graph.windows.net/929bfe53-8d2d-4d9e-a94d-dd3c121183b4/DirectoryObjects('Role_fe930be7-5e62-47db-91af-98c3a49a38b1')/Microsoft.WindowsAzure.ActiveDirectory.ReferencedObject",
20: "type": "Microsoft.WindowsAzure.ActiveDirectory.ReferencedObject"
21: },
22: "ObjectId": "fe930be7-5e62-47db-91af-98c3a49a38b1",
23: "ObjectReference": "Role_fe930be7-5e62-47db-91af-98c3a49a38b1",
24: "ObjectType": "Role",
25: "DisplayName": "User Account Administrator",
26: "Mail": null
27: }
28: ]
29: }
30: }
I didn’t adjust the formatting this time to account for the msdn blog layout clipping: if you are curious to see it in its entirety feel free to select the text, copy it and paste it in notepad, but that’s not required for understanding what I want to point out.
As you can see we are getting a couple of objects in our result set. One is the group “Sales”, the other is the role “User Account Administrator”: our user evidently belongs to both. The latter is one of the built-in roles, which define what the user can do in the context of AAD itself; the former is a custom security group, created by the AAD administrator. Both objects have their own IDs, which identify them unambiguously,
Line 13 to 16: this is one of my favorite things as of late. ASP.NET includes a reference to JSON.NET, a great library from Newtonsoft which truly eats JSON for breakfast. Let’s just say that, instead of going crazy to parse from C# the result string, I can just create a JObject and use LINQ to extract the values I need; namely, the DIsplayName for every security group and built-in role in the results. I am using the names (and picking both roles and groups) because that’s what you’d get with the classic isinrole: of course you can decide to restrict to specific types or refer to less ambiguous ObjectIds, provided that they mean something for your application.
Lines 19 and 20: finally, for each entry in the result set we create a corresponding claim of type role and we add it to the incomingPrincipal, which we will eventually return as the principal to be assigned to the current thread and passed to the application. Did you notice that string “GRAPH”? That is going to appear as the issuer of those new claims, to make it clear to the application that they were added a posteriori as opposed to being already present directly in the incoming token. Just using that string is pretty clumsy, using something a bit more informative (the query itself? The graph URL+tenantID URL?) might be more appropriate but for this tutorial I’ll go for conciseness.
Ottimo direi! This is all the code we need to write. Give it a Shift+Ctrl+B just to be sure; if everything builds nicely, we are ready to create a user for our test.
Provisioning Test Users with the Windows Azure AD Management UX
Given that you have an AAD tenant, you already have at least one user: the administrator. But why not taking this opportunity to play with the nice AAD management UX? Head to https://activedirectory.windowsazure.com, sign in as the administrator and prepare for some user & group galore.
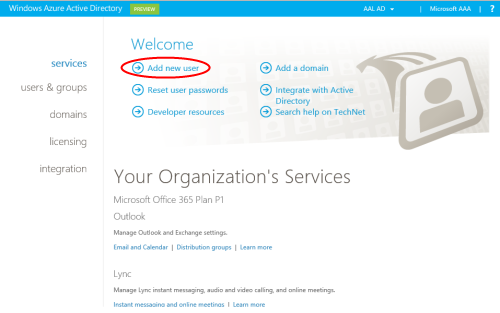
The first screen shows you a summary of your services and proposes entry points for the most common tasks. Pick Add new user.
The first screen is pretty straightforward. I am going to fill in the data for a random user 😉 once you have done it, click next:
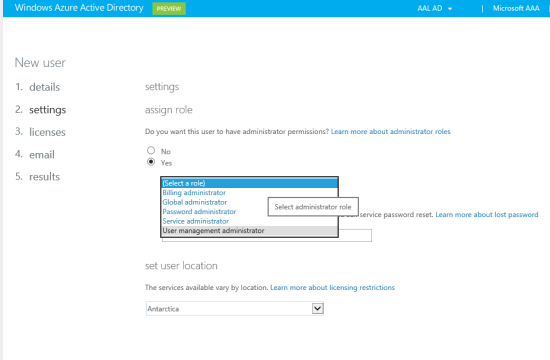
In this screen you are given the chance to assing to the new user one of the built-in administrative roles. I added User Management administrator, just to see how that will look like. Also, I picked Antarctica: not very useful for the tutorial, but pretty cool 🙂 hit next again. You’ll be offered to assign O365 licenses, that is also inconsequential for the tutorial. Hit next again.
You’ll be offered to receive the results of the wizard in a mail. Do whatever you want here as well 🙂 then click Create.
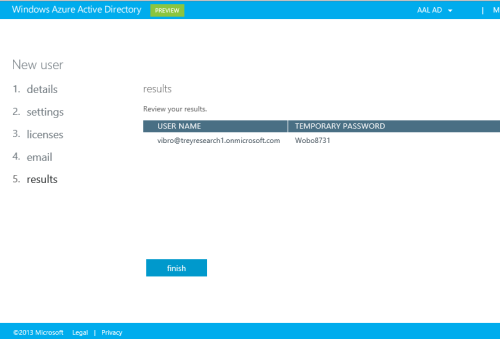
As a result, you are given the temporary password. Put it in a Notepad instance, you’ll need it momentarily; then click Finish.
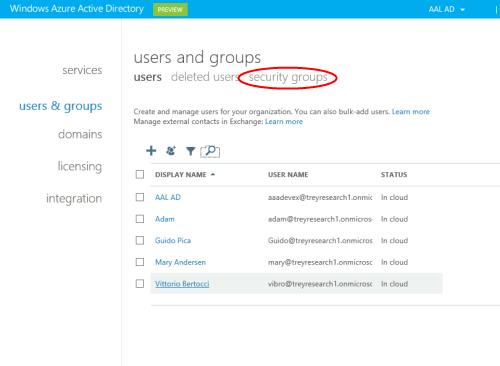
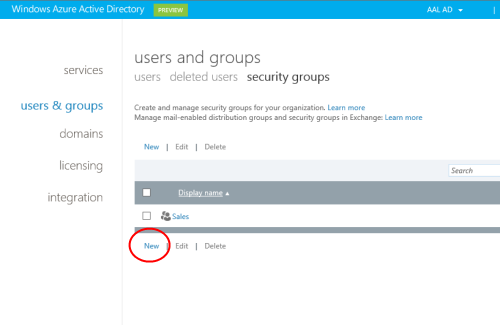
You’ll end up in the user management section of the portal. Let’s go to the security groups section and see if we can make our new user more interesting.
We already have a security group, Sales. Booring! Let’s create a new group, just to see how it’s done. Hit New.
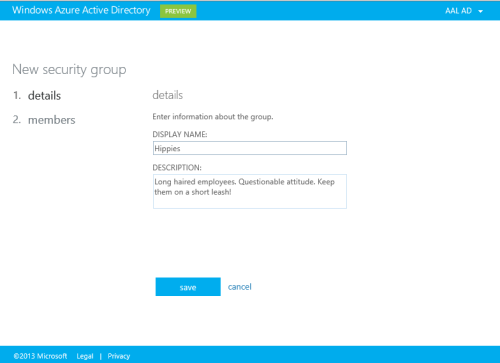
Add a name, a description, then hit save.
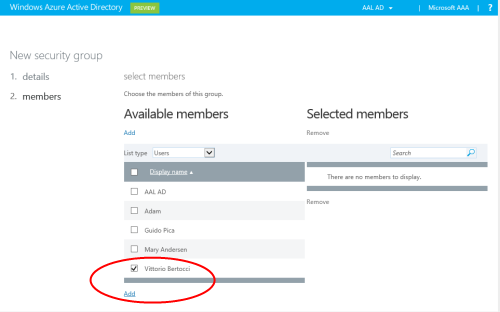
You’ll be transported to the group membership management page. Select the user you want to work with by checking the associated box, then hit add: you will see that the user gets added on the right hand side of the screen. Hit close.
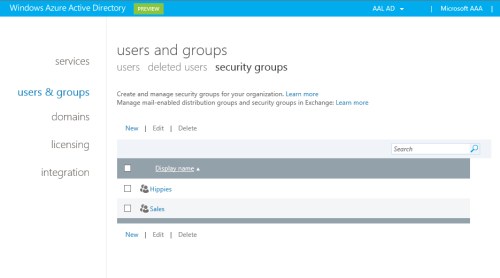
Your group is now listed along all others. We have one last task before we can give our app a spin: you have to change the temporary password of the newly created user. SIgn out of the portal by clicking on your administrator’s user name on the top right corner of the page and choosing Sign Out.
Sign back in right away, but this time using the new user name and temporary password.
Do what you have to do, then hit submit. You’ll be asked to sing in with your new password, and once you do so you’ll be back in the portal. We are done here, close everything and head back to Visual Studio.
Testing the Solution
Excellent! Almost there. Now that we prepared the stage to get roles information, it’s time to take advantage of that in our application.
Open HomeController.cs and modify the About action as follows:
1: [Authorize(Roles="Hippies")]
2: public ActionResult About()
3: {
4: ViewBag.Message = "Your app description page.";
5: ClaimsPrincipal cp = ClaimsPrincipal.Current;
6: return View();
7: }
Line 1: this attribute will ensure that only users belonging to the “Hippies” group can access this part of the application. This is standard MVC, good ol’ ASP.NET, nothing claims-specific.
Line 5: this line retries the ClaimsPrincipal from the thread, so that we can take a peek with the debugger without going though static properties magic.
Ready? Hit F5!
You’ll be presented with the usual AAD prompt. For now, access as the AAD administrator. You’ll land on the application’s home page (not depicted below, it’s the usual straight form the project template). Let’s see what happens if you hit the About link, though:
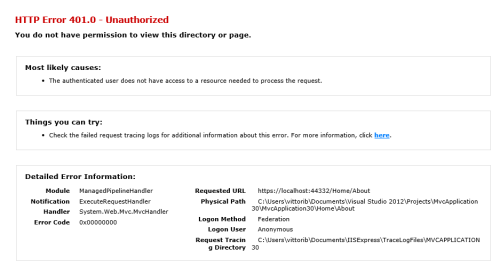
Surprise! Sorry, hippies only here – the admin is clearly not in that category 🙂 the error experience could be better, of course, and that’s easy to fix, but hopefully this barebone page is already enough to show you that our authorization check worked.
Let’s stop the debugger, restart the app and sign in as the new user instead. Once we get to the usual home page, let’s click on About.
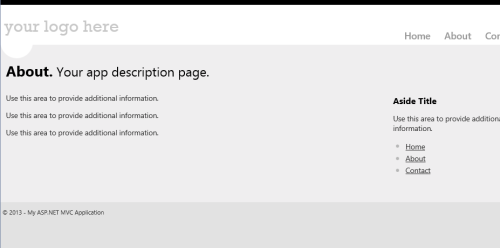
This time, as expected, we can access it! Very nice.
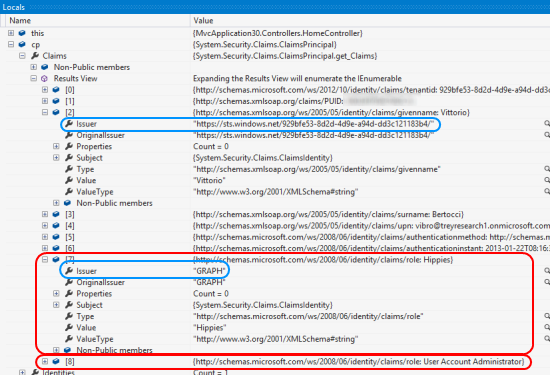
Let’s take a peek inside the incoming ClaimsPrincipal to see the results of our claims enrichment logic. Add a breakpoint inside the About() method, then head to the Locals and expand cp:
The claims from 0 to 7 are the ones we got directly in the original token from AAD. I expanded the Givenname claim to show (light blue box) that the issuer is, in fact, your AAD tenant (did I mention that this is a preview and claim types/formats/etc etc can still change?).
The claims at index 7 and 8 are the ones that were added from our GraphClaimsAuthenticationManager: I expanded the first one, to highlight our goofy but expressive Issuer value. Given that both claims are of the http://schemas.microsoft.com/ws/2008/06/identity/claims/role, and given that they are added before the control is handed over to the app, both can count when used in IsInRole, [Authorize], <authorization> and similar. Ta dah!
Summary
Yes, this took a couple of extra nights; and yes, this is definitely not production-ready code (for one, the GraphClaimsAuthenticationManager should cache the token instead of getting a new one at every sign in). However I hope this was useful for getting a more in-depth look to some interesting features such as the Graph API, the management UX, WIF extensibility and the structure of Windows Azure Active Directory itself. Remember, we are still in developer preview: if you have feedback do not hesitate to drop us a line!





This is exactly what I was looking for. I couldn’t understand how to retrieve the symmetric key for accessing the graph after using the mvc tool.
Very nice.
Thanks a lot! This closes the gap between what was currently out there in your documentation. Next step for me would be, to get to know how to authorize a second Azure AD within my application.