Using the JWT handler for Implementing “Poor Man”’s Delegation/ActAs
After much abstract thought (very well received! thank you! :-)) it’s time to get back to some good old C#, or you’ll think I’ve gone soft 
Say that you have a Web application protected via claims-based identity. Say that your application occasionally reaches out to a backend service, and that the service output (or even the ability of calling the service to begin with) depends on the current user of the Web application.
Sounds familiar? The need to flow identity through the layers of a solution is an extremely common one. The solution we’ve been offering through WIF, the ActAs flow, is extremely powerful but, as it turns out, also not the easiest thing to implement.
In this post I am going to describe a “low-tech” solution to the problem which can only be applied when very specific requirements are met, and is not nearly as powerful as full-fledged ActAs, but has the advantage of being substantially simpler to implement.
Flowing Identity Through Layers
I have written extensively about ActAs in the past (yes, I was already using a tablet in 2008; in fact, I was using one at least since 2004) and in the book; I also often spoke about it during breakouts (one of the most detailed explanations can be found here, from minute 54 on). I won’t repeat what I wrote then, but rather than sending you off to read tons of background material I’ll set a bit of context here.
The idea behind the ActAs approach to the problem described earlier in the post is pretty simple: when it needs to call the backend service, the Web application requests a token to the appropriate STS by presenting both its own application credentials and the token that the user presented in order to authenticate with the Web app itself (commonly referred to as the bootstrap token). The STS can then verify that the request is actually coming from the (well-known) Web application, and verify that the user is actually engaging with the Web app at the moment; hence, the STS can apply whatever logic it deems appropriate to manufacture (or not) a token that will fully reflect the situation (claims about the user, etc) and that is scoped precisely to the backend service.
That is a fantastic way of handling delegation though solution layers, far more robust and expressive than the classic trusted subsystem approach. In the most generic case, in which frontend and backend are operated by different & distinct owners, that is the right way of crossing the boundary between the two.
However, this is also quite complicated to set up. In WIF we made significant effort to support the scenario through the object model (CreateChannelActingAs, CreateChannelWithIssuedTokens, etc) however there are many moving parts you need to tame. Not every STS supports ActAs (ACS2.0, for one, doesn’t), creating your own ActAs STS entails grokking some pretty subtle concepts (like specifying which token handler will be used to process the user tokens) and various others. Troubleshooting ActAs scenarios is not the most fun you can have on Friday nights.
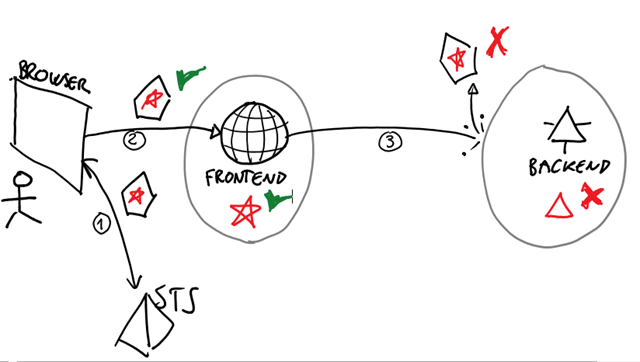
However in my experience the thing that developers have a hard time understanding is why can’t one just reuse with the backend service the same token that was presented by the user to authenticate with the Web application. It would be so simple! In fact, in the general case one cannot assume that that would work. In this post I give a long list of things that would prevent that approach from working in the most general case; here I’ll summarize with a simple analogy.
Imagine that you walk in a laundry shop and you leave there a bunch of shirts and a leather jacket; you write a bank check payable to the shop and you walk.
Say that the laundry takes care of the shirts in-house, but outsources the processing of leather goods to a specialized shop. Now, the laundry cannot pay the other shop by presenting the check they got from you, because the check is payable by the laundry shop only! Map the laundry shop to the frontend, the leather shop to the backend, the check to the token and the “payable to” field to the audience restriction element and the reason you can’t usually reuse tokens will be clear.
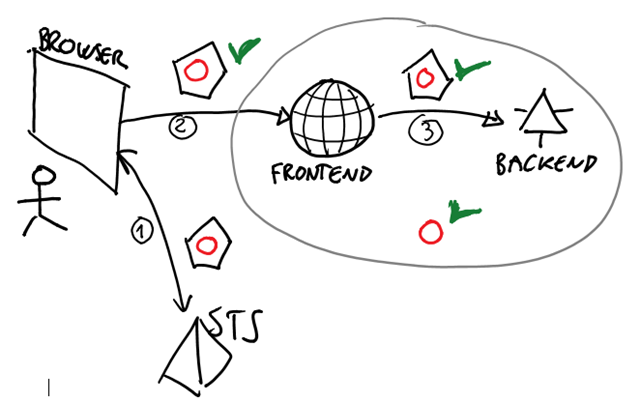
That said: not every laundry shop outsources leather goods processing! Say that the shirt and leather processing are simply assigned by different departments/cost centers of the same shop. In that case they would be both able to cash the check, which means that the check itself might move from the admin of the department who picked up the order to the admin of the leather processing center, and everything would still be fine. There you go: we found the special case in which reusing tokens might be a possibility.
Let’s map our analogy back to the digital world. If both frontend and backend are simply different aspects of the same solution, and belong to the same owner, then one could consider the differences between the two as mere implementation details. In identity terms: if the frontent and the backend belong to the same realm, then a token meant for one is also scoped for the other and vice versa. You’ll have to be careful that tokens delivered to the frontend cannot be stolen across sessions, and if you don’t want anybody to call the backend directly you better ensure that it is not publicly addressable, but in absence of further constraints in this case it should be OK for the frontent to invoke the backed by flowing the bootstrap token.
Even if people intuitively gravitated toward the token reuse approach, one of the technical reasons for which it was not implemented very often is what I was used to call protocol refraction. Just like light has different propagation characteristics in different mediums, in the WS-* world a token meant for a passive flow would be a bearer token and one for an active leg would be a holder-of-key, hence the token meant for the frontend would not have been fit for the backend. Well, that was 2008. In 2013, chances are that your backend will be implemented as REST services: and REST services are perfectly happy with bearer tokens.
The final barrier to a successful implementation was the sheer size of the tokens at play. Being in SAML format, a typical Web sign-in token would usually be too big to travel in HTTP header. Well, enter the JSON Web Token (JWT). With ACS you can do a classic WS-Federation web sign-on flow which carries a JWT instead of the canonical SAML. As long as the above restrictions hold and you are in the right scenario, that constitutes a great bootstrap token that is perfect to be used for invoking a REST service.
Got it? I like to call this approach the “prrom man”’s ActAs. Tha is not meant to be derogatory, it just expresses the fact that this approach tries to solve the same problem that we would have normally addressed with ActAs. Although it does not have the same generality and expressive power of ActAs (not even close), it does require with significantly less resources and, provided that your scenario allows for it (do you clean your leather in-house or do you outsource it?) it gets the job done,
An Example
Blah, blah, blah. I know, right? That’s called logorrhea, and I have it since I was little. Enough with the blabber, let’s hit Visual Studio and see how it’s done.
- Create a blank solution (I called mine “PoorMansActAs”).
- Add a new project of type “ASP.NET MVC 4 Web Application” as a frontent – I called mine “Frontend”. I picked the “Intranet Application” sub-type as it is more compact than others but still has enough surface to be a good starting point.
- Add a new project of type “ASP.NET MVC 4 Web Application”, “Web API” as a backend – you guessed right, I called mine “Backend”.
That sets the stage. Below I am going to go in the details of how to set up frontent and backend to implement the poor man’s actas flow. Also: I have noticed that lately in my posts I have left a lot as “exercise for the reader”, referring to published samples. Here I’ll try to be a bit more descriptive, and paste & comment code snippets even if those are already available elsewhere.
The Frontend
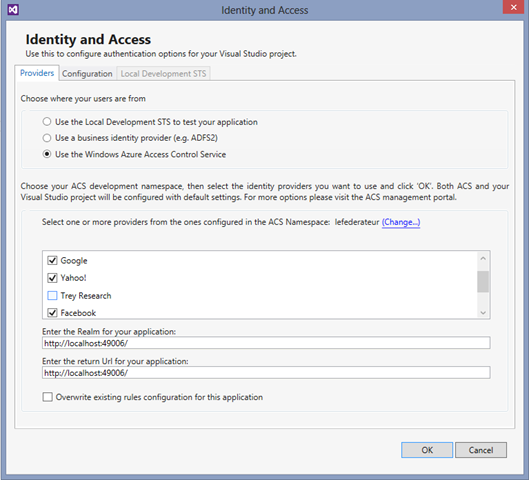
Let’s start by making our frontend outsource authentication to ACS and process JWT tokens. Thanks to the identity and access tool for VS 2012, this is going to be super-easy. Right click on the project, pick Identity ad Access… and choose ACS. Note: later we’ll use the email claim, hence you might want to select only identity providers that make it available via ACS (like Facebook).
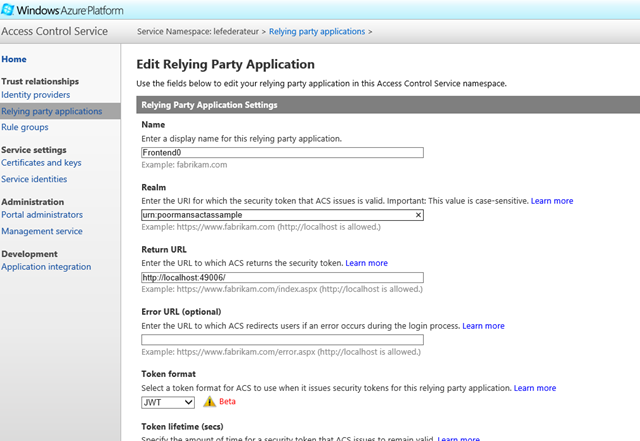
Very good. By default, ACS wills end us a SAML token. We want to change that. Let’s hit the Windows Azure portal, select the ACS namespace of choice, pick the RP that the VS tool created for us and edit it as follows:
The main things to observe in the screen above are:
- The realm value. I have chosen a generic URI, which represents the logical identifier of my solution as a whole (as opposed to reusing the address of the frontend or the backend, the default choice). One day I’ll likely write a long rant about realm != return URL, but for today that’s enough
- The token format. I changed it ot JWT.
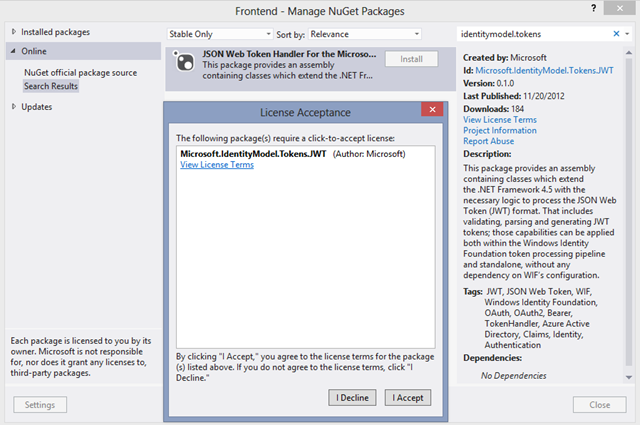
From now on ACS will do the right thing and send us JWTs. The next step is to teach to our application how to digest them! Right click on the solution and go to the Manage NuGet Packages,.. entry.
Search for identitymodel.tokens and you’ll land on the NuGet for the JWT handler. Don’t do like Kyle, do read the license terms and if you’re OK with them hit I Accept to install the package.
Great! Now you have the assembly with the right types available. head to the web.config and add few lines to take advantage of the JWT token handler.
1: <system.identityModel>
2: <identityConfiguration saveBootstrapContext="true" >
3: <audienceUris>
4: <add value="urn:poormansactassample" />
5: </audienceUris>
6: <securityTokenHandlers>
7: <add type="Microsoft.IdentityModel.Tokens.JWT.JWTSecurityTokenHandler, Microsoft.IdentityModel.Tokens.JWT" />
8: <securityTokenHandlerConfiguration>
9: <certificateValidation certificateValidationMode="PeerTrust"/>
10: </securityTokenHandlerConfiguration>
11: </securityTokenHandlers>
12: <issuerNameRegistry type="System.IdentityModel.Tokens.ConfigurationBasedIssuerNameRegistry, System.IdentityModel, Version=4.0.0.0, Culture=neutral, PublicKeyToken=b77a5c561934e089">
13: <trustedIssuers>
14: <add thumbprint="C1677FBE7BDD6B131745E900E3B6764B4895A226"
15: name="https://lefederateur.accesscontrol.windows.net/" />
16: </trustedIssuers>
17: </issuerNameRegistry>
18: </identityConfiguration>
19: </system.identityModel>
20: <system.identityModel.services>
21: <federationConfiguration>
22: <cookieHandler requireSsl="false" />
23: <wsFederation passiveRedirectEnabled="true"
24: issuer="https://lefederateur.accesscontrol.windows.net/v2/wsfederation"
25: realm="urn:poormansactassample" requireHttps="false" />
26: </federationConfiguration>
27: </system.identityModel.services>
28: configuration>
The tool filled in almost everything you need. the only lines you have to add/modify are
Line 2: you want to opt in for saving the bootstrapContect. This will come in handy later, when we’ll call the backend service
Line 4: the tool autogenerated a realm for you, hence an expected audience value. You want to change that value to the realm we set in ACS.
Lines 6 to 11: this is boilerplate code to add the JWT handler in the handlers list.
Line 25: as for line 4, we need to update the realm to what we set in ACS
That’s it for the code meant to enabling JWT-based web sign-on. You still need to install in the trusted people the certificate needed to verify ACS’ token signatures. See here (and specifically “Using the JWT Handler With WIF Applications”) for hints on how to do that.
If you want you can give the project a spin now, just to verify that the sig-in works. We’ll get back to this project later to add the logic to perform the call to the backend.
The Backend
We need to add the JWT handler NuGet to the backend project as well. Done that, let’s add some logic to the Web API project to expect and validate incoming tokens via the OAuth bearer calling style. As shown in all the JWT/AAL samples, we do that by implementing a single DelegatingHandler that deserializes and validates the token.
Let’s head to the global.asax and start with the following:
1:internal class TokenValidationHandler : DelegatingHandler
2:{
3:
4:
5: private static bool TryRetrieveToken(HttpRequestMessage request, out string token)
6: {
7: token = null;
8: IEnumerable<string> authzHeaders;
9: if (!request.Headers.TryGetValues("Authorization", out authzHeaders) || authzHeaders.Count() > 1)
10: {
11: return false;
12: }
13: var bearerToken = authzHeaders.ElementAt(0);
14: token = bearerToken.StartsWith("Bearer ") ? bearerToken.Substring(7) : bearerToken;
15: return true;
16: }
this very basic code retrieves the token, if any, from the http Authorization header.
The real meat is in the following method:
1: protected override Task<HttpResponseMessage> SendAsync(HttpRequestMessage request, CancellationToken cancellationToken)
2: {
3: HttpStatusCode statusCode;
4: string token;
5:
6: if (!TryRetrieveToken(request, out token))
7: {
8: statusCode = HttpStatusCode.Unauthorized;
9: return Task<HttpResponseMessage>.Factory.StartNew(() =>
new HttpResponseMessage(statusCode));
10: }
11:
12: try
13: {
14: X509Store store = new X509Store(StoreName.TrustedPeople,
StoreLocation.LocalMachine);
15: store.Open(OpenFlags.ReadOnly);
16: X509Certificate2 cert = store.Certificates.Find(
X509FindType.FindByThumbprint,
"C1677FBE7BDD6B131745E900E3B6764B4895A226",
false)[0];
17: store.Close();
18:
19:
20: JWTSecurityTokenHandler tokenHandler =
new JWTSecurityTokenHandler();
21: TokenValidationParameters validationParameters =
new TokenValidationParameters()
22: {
23: AllowedAudience = "urn:poormansactassample",
24: ValidIssuer = "https://lefederateur.accesscontrol.windows.net/",
25: SigningToken = new X509SecurityToken(cert)
26: };
27:
28: Thread.CurrentPrincipal =
tokenHandler.ValidateToken(token, validationParameters);
29:
30: return base.SendAsync(request, cancellationToken);
31: }
32: catch (SecurityTokenValidationException e)
33: {
34: statusCode = HttpStatusCode.Unauthorized;
35: }
36: catch (Exception)
37: {
38: statusCode = HttpStatusCode.InternalServerError;
39: }
40: return Task<HttpResponseMessage>.Factory.StartNew(() =>
new HttpResponseMessage(statusCode));
41: }
42: }
What’s happening here? Quick walkthrough:
Line 6: retrieve the token via the method defined earlier
Lines 14 to 17: retrieve the X509 certificate used for verifying ACS’ token signatures
Lines 20 to 26: initialize a new JWT handler with validating parameters including the expected audience (the realm), the expected issuer and the just-retrieved certificate
Line 28: validate the token; if successful, create a ClaimsPrincipal and assing it to the current thread for the main API logic to have access to it
| IMPORTANT UPDATE: Dominick rightfully points out that with Web API just assigning the newly minted ClaimsPrincipal to Thread.CurrentPrincipal s not enough. He gives the whole story here, but in you’re in a hurry: you’ve got to assign it to HttpContext.Current.User, too. |
OK, it’s still security, but as protocol/security code goes I’d daresay this is pretty straightforward,
Now: we need to get this puppy in the We API pipeline. We do so by adding it to the HttpConfiguration:
1:static void Configure(HttpConfiguration config)
2:{
3: config.MessageHandlers.Add(new TokenValidationHandler());
4:}
We just need to call Configure in Application_Start, and we’re all set.
Alrighty. We could do all sorts of interesting things with claims in our Web API, but here I’d just like to do something that proves we did have access to them. I’ll ignore every common decency and return the value of the email claim without doing any error checking.
1: // GET api/values/5
2: public string Get(int id)
3: {
4: return ClaimsPrincipal.Current.FindFirst(ClaimTypes.Email).Value;
5: //return "value";
6: }
Perfect! Our API is all ready to be securely invoked. Let;s get back to the frontend and make it happen.
Flowing the Caller’s Identity
Back to the frontend. Let’s pick one of the default actions in the home controller and add the necessary logic to retrieve the bootstrap token and use it to invoke the backend service. There you go:
1:public ActionResult About()
2:{
3:
4: BootstrapContext bc =
ClaimsPrincipal.Current.Identities.First().BootstrapContext
as BootstrapContext;
5: JWTSecurityToken jwt = bc.SecurityToken as JWTSecurityToken;
6:
7: string rawToken = jwt.RawData;
8:
9: HttpWebRequest request =
WebRequest.Create("http://localhost:49007/api/values/5") as HttpWebRequest;
10: request.Method = "GET";
11: request.Headers["Authorization"] = "Bearer " + rawToken;
12: request.ContentType = "application/json";
13:
14: string responseTxt = String.Empty;
15: using (HttpWebResponse response = request.GetResponse() as HttpWebResponse)
16: {
17: var reader = new StreamReader(response.GetResponseStream());
18: responseTxt = reader.ReadToEnd();
19: response.Close();
20: }
21:
22: ViewBag.Message =
"I just called the backend, and I got back " + responseTxt;
23:
24: return View();
25:}
What’s happening here:
Line 4: we retrieve the bootstrap context. For details, see this post.
Line 5: we cast the bootstrapcontext content to a JWT
Line 7: we retrieve the JWT in encoded form, ready to be put on the wire
Lines 9, 10 and 12: we prepare an HttpWebRequest to invoke the backed service
Line 11: we add the bootstrap token in the appropriate header
Lines 14-20: we invoke the service and retrieve the results
Line 22: we surface the result in the UI
That’s all you need. Hit F5; authenticate with the frontend; hit about and observe that the frontend successfully called the backend using the bootstrap token.
Wrapup
In the general case, if you need to make delegated calls between layers of your solution you should consider using ActAs.
That said: if you own both frontend and backend, frontend and backend can truly be considered components of the same app, your backed is REST, your web sign-in token format allows for it, you are OK with your backed to be callable without going though the frontend (or there are “physical” barriers in place to prevent that) then the poor man’s ActAs can provide a simpler – albeit more limited – alternative. Have fun!
P.S.: kudos to my wife for the laundry example, my original example was pretty lame!


Thanks for this great tutorial for how all the pieces of Authentication fit together.
I’m curious how you would implement Authorization though. After JsonWebTokenValidationHandler set’s the ClaimsIdentity for both the Thread.CurrentPrincipal and HttpContext.Current.User, I am unable to hook into an implementation of ClaimsAuthorizationManager that is registered via web.config:
I was hoping to use my custom claimsauthorizationmanager to look at the claims that are in the user/principal and decide whether that principal has access to the given resource it is trying to access. First off, it’s curious that this doesn’t work.
Is the intention instead to use the JsonWebTokenValidationHandler to do this authorization check?
I wanted to be very careful in explaining that I am interested in authorization, not authentication. I also want to note, the the Nuget package I’m using automatically adds the delgatinghandler and calls it JsonWebTokenValidationHandler instead of using the name TokenValidationHandler referenced in your example.
Thank you.
sorry, it seems the web.config got stripped out by your blog:
<system.identityModel>
<identityConfiguration>
<claimsAuthorizationManager type=”Backend.TestClaimsAuthorizationManager, Backend”/>
</identityConfiguration>
</system.identityModel>
Hi Andy,
thank you for your kind words.
For the ClaimsAuthorizationManager: normally you also need to add the corresponding HttpModule http://msdn.microsoft.com/en-us/library/system.identitymodel.services.claimsauthorizationmodule.aspx in config in order for it to kick in, however in this case you might want to call it explicitly, directly from the message handler code.
For the NuGet package: all of our documentation (and all of the posts you see here) are about the package you find in http://nuget.org/packages/Microsoft.IdentityModel.Tokens.JWT/ – if you are using some other package then things will work differently and what you read here won’t apply.