Microsoft ASP.NET Tools for Windows Azure Active Directory – Visual Studio 2012
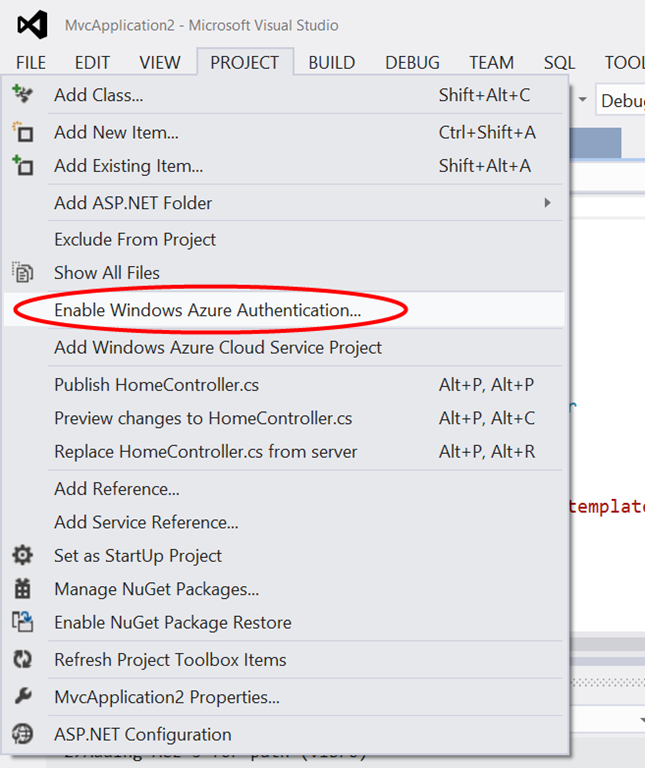
If you guys had a chance of seeing the Windows Azure AD session at //BUILD, or more recently at the P&P Symposium, you already know that the previews of ASP.NET Tools Fall update included a feature to easily configure a Web application to use Windows Azure AD; it is what added the “Enable Windows Azure Authentication” menu entry in the project explorer’s context menu.
Today Scott Guthrie announced the RTM of the ASP.NET and Web Tools 2012.2 Update. However, Windows Azure AD is still in preview mode: hence, the associated feature was extracted from the main install and repackaged in its own tool, still in preview. In the process the feature acquired its own name: allow me to introduce the Microsoft ASP.NET Tools for Windows Azure Active Directory – Visual Studio 2012.
You can find the MSI for Visual Studio 2012 here; the MSI for the express SKUs is here.
Important: before installing the ASP.NET Tools for Windows Azure Active Directory you do need to install the ASP.NET and Web Tools 2012.2 Update. Thanks to Magnus for suggesting this clarification!
New in this release
This release has a couple of differences from the last preview.
The most visible difference is in the location of the menu entry which activates the feature. Whereas the earlier previews placed it in the context menu of the solution explorer, the latest preview offers it under the Project menu.
The other differences are mostly invisible, unless you open the autogenerated web.config and take a look at the code emitted.
The most notable difference is that the tool now uses the ValidatingIssuerNameRegistry, as I somewhat anticipated here. Below there’s an example of what the tool generates against my test tenant:
<issuerNameRegistry
type="System.IdentityModel.Tokens.ValidatingIssuerNameRegistry, System.IdentityModel.Tokens.ValidatingIssuerNameRegistry">
   <authority name="treyresearch1.onmicrosoft.com">
     <keys>
        <add thumbprint="3464C5BDD2BE7F2B6112E2F08E9C0024E33D9FE0" />
     </keys>
     <validIssuers>
       <add name="https://sts.windows.net/929bfe53-8d2d-4d9e-a94d-dd3c121183b4/" />
     </validIssuers>
    </authority>
</issuerNameRegistry>
The other difference is that there is no longer any mapping code for the Name claim, given that now AAD emits a Name claim that WIF automatically picks up.
There are some other differences in the Publish user experience, but in the default case (the developer is also a directory tenant admin) the flow is really unchanged. I am told that the documentation of the tool will be updated soon: there you’ll find all the details in a thorough walkthrough, hence I won’t duplicate content here. I’ll update with a link as soon as I get it.
If you want to experience the preview of Windows Azure AD for Web SSO, there is no simpler way than through the Microsoft ASP.NET Tools for Windows Azure Active Directory. Go get it!!! ![]()


Very great feature!!!