Fun With Federation 1: ASP.NET, Geneva Framework & FedUtil.exe
I won’t make names, of course, but somebody in the Identirati community often insinuates that Vittorio is card-centric :-). Now, while I’ll admit that I do have a personal preference for the active case, I definitely refuse the notion that I’m just about cards: and just to make a point, I’ll write few posts about the passive case. For example, today I’ll walk a mile in the shoes of an ASP.NET developer at one web ISV firm, who needs to add some personalization features to his app but he is not especially fond of or well versed in “identity stuff”: you’ll see that he will be handsomely able to achieve his goals without ever leaving his comfort zone.
The base website
Let’s start by creating a good old ASP.NET Web Site.

Our customization requirements are simple:
- We want to greet the user on the landing page
- We need to show the phone number assigned to the user (which may change often)
- We have a page that we want to show only to users belonging to a certain role
The UI for doing the above is simple enough: we add some text, a couple of labels placed strategically for name and phone number, a link to our restricted page, and the restricted page itself. The resulting project looks like the following:
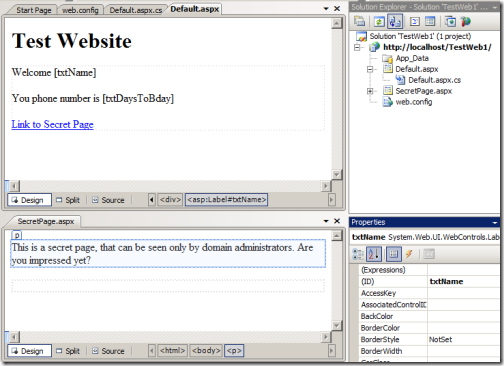
Configuring the app for accepting identities from a partner
We have all our UI in place; kid’s play so far, isn’t it. Now: the intended audience of our application are the employees of a partner company, Adatum Corporation. Our next step is making sure that my application will allow access to those users and keep out everybody else. Furthermore: we have no intention of maintaining profiles for all those users, hence we’ll need to get the information we need (name, phone, roles) directly from the partner.
We’ve been told that we can configure our app to do both things at once, simply by running a wizard that comes with that identity library that the IT guys recently installed, what was the name… ah the Geneva Framework. Still in beta, but already awesome :-)Let’s open a command prompt and navigate there.
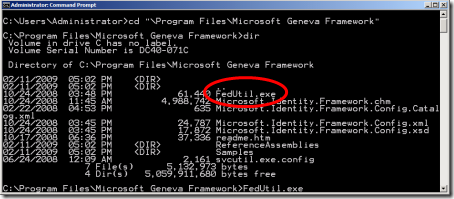
Here it is, the tool is called FedUtil.exe. Let’s run it:

It says “This wizard helps you to establish a trust relationship between a Relying Party application and a Security Token Service”. “trust relationship” sounds about right what we want to achieve; let’s move on.
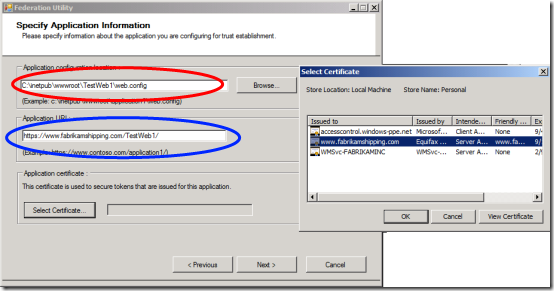
The first step is all about describing our application:
- The field in the red circle points to the web.config of our application: presumably, that’s were all the config info will go
- The field in the blue circle is the production URI of our application
- The last area, application certificate, will typically be filled with the SSL certificate of our website. The dialog on the right helps us to pick it
On to the next step:
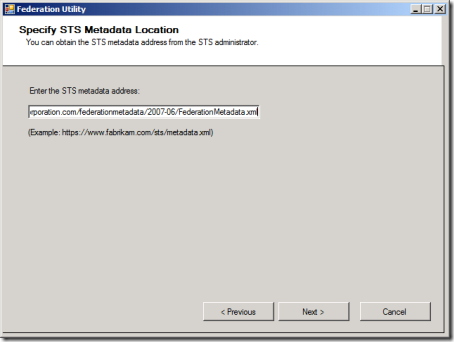
Right, this step is about specifying from where we should get the partner’s configuration info: here we will just paste “as is” the address that we got from the partner’s IT department, and we move on. The wizard spins a progress bar few moments, then it displays the following screen:
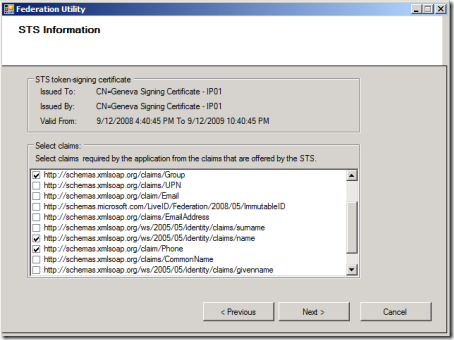
Ahh, very well: time to go attribute-shopping! We successfully contacted the partner, and here we get a list of the things that their system is willing to tell us about their users. We said that we need name and phone, hence we select it. We also need information about roles, but we don’t see any here: the best approximation seems to be “group”, hence we pick it: later we’ll verify if we can use it in lieu of roles. If the STS throws lemons at you, make lemonade 😉 Moving on.
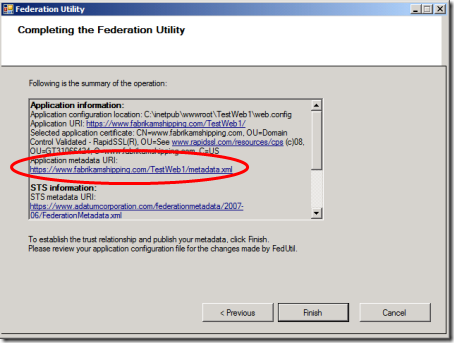
We are almost done. Before hitting “Finish”, we need to write down what the wizard calls the “Application Metadata URI”.
We click “Finish”: the wizard briefly cranks up, and we are done. If we had the web.config open in Visual Studio, we’ll get a warming that it has been modified: and if we observe our project folder in the file system, we’ll discover that a new file metadata.xml has just blossomed.
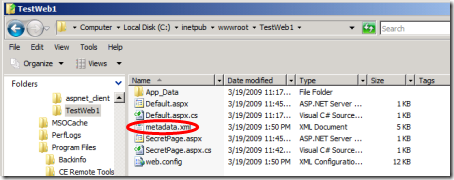
We don’t care much about the content: what’s important is that it is there, because now we have to send a mail with a reference to it (the “Application Metadata URI” we wrote down earlier) to the IT guys at the partner. There they will use it for making sure that their system will allow their employees to sign in in our application, and that in the process they will also send the info we require (name, phone,group).
After few minutes (hey, they’re FAST!) we get back a mail from Adatum, telling us that our application is now recognized from their system and we are good to go. Time to get back to Visual Studio.
Restricting application access
Oook, what do we need to do for making sure that only Adatum employees can use our app? Set up a username/password store? Please, not those client certificates thingy again!
Good news: authentication-wise, there’s nothing left to do for you. The wizard we ran earlier took care of activating federated authentication, whatever that means, and now the application is configured for accepting only people from Adatum. Want to hear the best part? We don’t care about HOW the people from Adatum authenticates: that’s a problem for the administrators that will maintain the app in production. Our customization code won’t change, hence nothing to worry about for us.
Customization and driving application behavior
What’s the expected behavior of our application again?
- We want to greet the user on the landing page
- We need to show the phone number assigned to the user (which may change often)
- We have a page that we want to show only to users belonging to a certain role
The first one is pretty easy. What would we do if this would be a classic ASP.NET app running on our intranet? Let’s take a look at the Page_Load event of our default page:

Surprise surprise, that’s precisely what we do here as well.
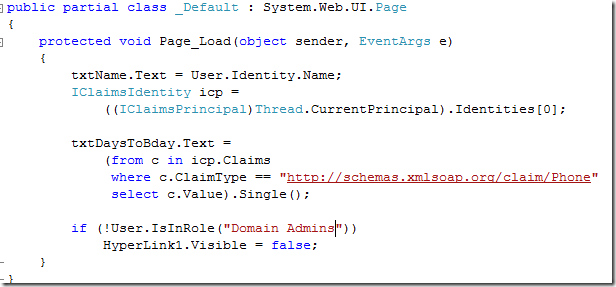
Let’s now tackle #2. Now, the phone is a mildly more exotic kind of information: we don’t expect it to be a member of the User class. This is the point in which we explicitly use the object model of the Geneva Framework. All the info we requested during our wizard are available to us in our user principal, provided that we cast it to the right class:

IClaimsPrincipal and IClaimsIdentity derive from IPrincipaland IIdentity, respectively. IClaimsIdentity contains a collection, Claims, where we can find all the user information we received from Adatum: it’s just a matter of knowing the right name of the property we are looking for. When we ran the FedUtil wizard, at a certain we chose the properties we were interested into: if you observe the screenshot describing that point, you’ll see that the full name of the phone attribute was listed. We just need to query the Claims collection and extract it:
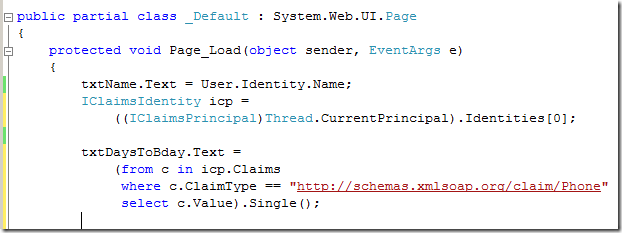
That’s linq for you: and we took care of #2. Note that in many, many cases we would not need to actually use those long strings, but we’d be able to refer to specific attributes by using string constants offered by the Geneva Framework.
How about #3? If we’d be dealing with classic roles, we could just use a IsInRole and make the link to the page disappear in case the user is not in the right club:
Naturally that would not be enough, since the clever non-domain admin could just access the URI directly without the need of following the link; hence we need to go to the web.config and add a specific authorization directive about this:
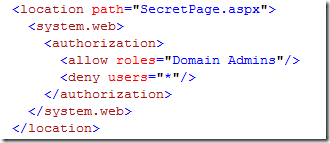
Good old ASP.NET syntax & practices. As you already imagined, the above still works for our website, despite the fact that we are using the geneva framework and federated authentication.
The last gotcha we need solve is about the fact that we weren’t really able to get roles from Adatum: rather, we got Groups. The Adatum IT guys tell us that they have the same semantic, which means that they contain the information we need: now it’s just a matter of making sure that ASP.NET recognizes Groups as roles. They way in which we do it is pretty straightforward: we paste a certain XML fragment in the web config, namely in microsoft.identityModel (the geneva framework config element):

The URI we put in the Value attribute comes again from the same place from where we got phone. Also in this case, we were pretty unlucky: if Adatum would have provided us with roles directly, we would not have needed this step at all.
Running the application
That’s about it. We send an email to the Adatum guys, telling them that they can start hitting our application URI and see if that works.
Let’s move our perspective to the PoV of an Adatum employee, our long time friend Adam Carter (remember PDC?). Adam receives a mail with the URI of the app, http://www.fabrikamshipping.com/TestWeb1/Default.aspx, and tries to access it right away.

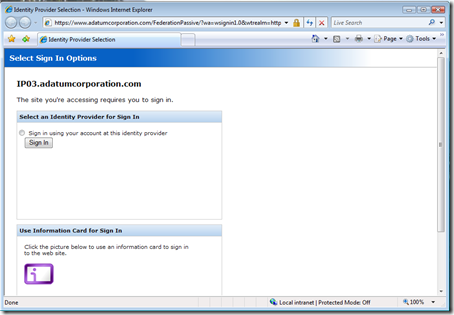
He lands on the familiar pages of Adatum’s Geneva Server instance, where he is given various authentication options. He choose the Identity Provider option, Windows Integrated Authentication.
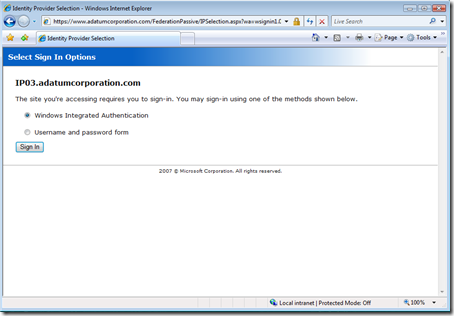
As he clicks, he lands on the app:

Ta dahh! May not have been exactly rocket science, but it worked flawlessly at first attempt. In fact, with just a little querystring wizardry the Adatum IT guys provide Adam with a URI that pre-selects the windows integrated authentication on the Geneva Server and give him true SSO to the app when he access it from Adatum’s intranet (wise-URI courtesy of Donovan):
![]()
Not bad for less than 30 mins of work, eh?
Summary
This was easy. We created a web site from scratch, configured it for accepting identities from a partner, drove its behavior according to identity attributes and established declarative authorization rules on content visibility: and I’m not even sweaty! This was a simple case but, mind you, not the simplest possible: we did have to find our way for extracting the phone info, and we had to establish an explicit mapping instead of receiving raw roles directly. All common stuff, since we don’t usually have much control on what we get from our partners.
My loyal readers may have noticed something odd about the above text. I have NOT talked diffusely about tokens, trust, encryption, federation relationships,identity providers, metadata… I didn’t even mention claims if not as the name of a collection in a class! The point I hoped to make here is that you don’t need to be an identity expert for reaping the benefits of claims-based access. Quite the opposite: thanks to the claims based approach, which helps moving complexity AWAY from the application and externalize authentication concerns, the application developer is free to focus on what the application is supposed to do and take advantage of the identity info gathered by the authentication layer without a thought about how it woks.
Back in October 2005 I was comparing WS-* to calculus and identity to the Radon transform, the mathematical tool that makes CT scans possible. Well, we came a long way since then. It’s like if until few months ago CT scans were mainly a theoretical possibility, debated only at math conferences, and now we finally have instruments that can actually perform scans on people. How many medical doctors understand the math behind a CT scan? Very few, I guess: that’s not a requirement for taking advantage of a CT scan machine for diagnosis or whatever they use it for. Now when I talk about identity I always try to assess if my audience is made of “mathematicians“ or “doctors”; I may have more fun talking to “mathematicians”, but I am very well aware that the potential of the tool must come, WILL come from the “doctors”. Welcome to Mainstream, folks. Hope you enjoyed the ride 😉
But I digress. In the next installment we’ll take a look at what Adatum had to do for enabling its users to access the application we developed here: we will discover what they did with the “Application Metadata URI” that they received via mail at the beginning of this post. It will be an odd thing coming from me, since I am not big on ITpro stuff: in fact I’ll almost surely oversimplify and skip important steps, hence I recommend to keep an eye on Donovan’s blog: he is starting a series on setting up Geneva Server, and in line with the character he’ll be way more thorough and precise than I’ll ever be. Ah, and of course the official sources of goodness for Geneva remain the team blog and the forum.

great article … i wanted to use claims issued by geneva server on asp.net sites that require windows authentication… i was wondering at what stage of the pipeline should we produce the Windows Identity to have asp.net web site pick it up…. i want to extend this approach to sharepoint to enable windows authentication on sharepoint with geneva framework.. essential for windows integration feature on sharepoint.. any help would be greatly appreciated .. thanks