Enhance your ASP.NET Membership-based website by adding Identity Provider capabilities
I can’t tell you how happy I am to finally have something like the Geneva Framework available. With something that takes care of all the nitty-gritty details of the underlying protocol legwork, I am finally free to describe the advantages of the claims based approach in very concrete terms: and above all, without assuming any previous knowledge of federation or similar concepts. Yay!
Today I want pull off an interesting stunt. I’ll show you how one can *easily* enhance a common ASP.NET membership based web site with identity provider capabilities; in the process I will also give you a taste of what it means to be an identity provider, or what it means to rely on one identity provider, again in very practical terms. Perhaps some identirati will frown at some of the simplifications I’ll make: don’t mind them, there is no shortage of advanced material to check out later if you discover that you want to know more about this.
Without further ado: let’s get to work. Let’s say that you own a successful web business: your brand is well recognized, and your website maintains a lot of users. For the sake of the post here, let’s say that you run a club for long haired architects.
You handle user authentication with ASP.NET membership, and you are very happy with it: you deem it appropriate for your needs, and you see no reasons to change it. As somebody with an interest in identity I tend to prefer solutions with more expressive power, but I totally respect your opinion and I won’t try to change it a bit (this time ;-)).
There are many businesses that would be delighted to partner with you: for example, a web shop for hair products would be very happy to attract members of your club since long haired people notoriously spend copiously on shampoos and similar. In meatspace, that’s pretty easy: your members walking in the shop can just exhibit their club membership card and get the agreed discount. For an online shop the solution is less straightforward: the shop needs to find a reliable way of recognizing that the current site visitor is indeed one of your users. The trivial ways of achieving this are usually flawed in a way or another, and I won’t go though them here: instead, I’ll go straight to the point. The shampoo shop cannot authenticate YOUR users without doing unholy things like duplicating user stores; the competent structure for doing that is your authentication system. Hence the solution is giving to the shampoo shop an automated mean of tapping your authentication system; in other words, enabling your website to offer identity as a service. The good news is that there are many standard mechanisms that help doing just that in predictable & repeatable manner; the other good news is that with the geneva framework implementing this is trivial. Technically, this means making your club website an Identity Provider. Below I’ll show you how to enhance your club web site for exposing authentication as a service, then how to configure the shampoo shop website in order to take advantage of your authentication system.
Adding identity provider capabilities to your membership website
There are many ways of being an identity provider. In our case, the simplest is adding to our website a special page that will be consumed by third party websites whenever they want to offer their services to our own users. This page is special in the sense that the third party websites will access it by following a certain standard protocol. The beauty of this is that if every website involved sticks with the same standard, then we won’t need to worry about writing code for making that communication happen, we’ll be able to use off-the-shelf technologies (such as geneva framework if we have ASP.NET, its counterparts if we have different platforms) that will take care of the details for us. In this case the underlying protocol will be WS-Federation, but that’s literally an implementation detail you don’t need to know for setting the system up.
Let’s get to work! Here I am using the Hairy Architect Club membership site (HA club) I described here, but you can use whatever membership based website you already have.
The first thing we need to do is adding our special page (which we’ll call PassiveSTSEndpoint.aspx, I’ll explain why later) to the project:

We can add some UI elements to the page, but that’s just for recognizing it in the editor: this UI will never really appear.

Why did I call the page “Passive STS”? I promised I would not go in details, and I wont. Suffice to say that our special page will contain logic for retrieving the identity of the user who is right now authenticating, and will package it in a standard format that the third party website following the same standard will understand. The code performing such a function often goes under the name of Security Token Service, or STS; and we call it passive because that’s the convention we use when we interact with the user via a browser. The term “token” indicates the structure we use for packaging & transmitting identity information, and is the output of the STS.
The next step is in fact adding the logic we want to trigger when the new page is accessed. That’s mostly pre-canned logic, that you could obtain just by cut&paste from the Geneva framework SDK samples. Step by step:
We add the App_Code folder to the project:

We add to it the CertificateUtil.cs file, that we get from the geneva framework SDK samples

We add a reference to Microsoft.IdentityModel.dll, which is in fact the Geneva Framework assembly.

OK, let’s add a new CS file (MembershipSTS.cs).

The code below comes out directly from the SDK samples, it’s simple cut & paste. The only thing it does is preparing the crypto info that the protocol will use for securing the output.
Note: here you’d normally also verify which third party website will make use of the user identity you are required to produce, and stop the process if you are not happy with it. The SDK samples show you how to do that; here it’s omitted for brevity.
using System;
using System.Collections;
using System.Collections.Generic;
using System.IdentityModel.Tokens;
using System.Linq;
using System.Security.Cryptography.X509Certificates;
using System.Security.Principal;
using System.ServiceModel;using Microsoft.IdentityModel.Claims;
using Microsoft.IdentityModel.Configuration;
using Microsoft.IdentityModel.SecurityTokenService;
using System.Web.Security;/// <summary>
/// A custom SecurityTokenService implementation.
/// </summary>
public class MembershipSTS : SecurityTokenService
{
static readonly string EncryptingCertificateName = “CN=localhost”;public MembershipSTS(SecurityTokenServiceConfiguration configuration)
: base(configuration)
{
}protected override Scope GetScope(IClaimsPrincipal principal, RequestSecurityToken request)
{Scope scope = new Scope(request, SecurityTokenServiceConfiguration.SigningCredentials);
scope.EncryptingCredentials = new X509EncryptingCredentials(CertificateUtil.GetCertificate(StoreName.My, StoreLocation.LocalMachine, EncryptingCertificateName));
scope.ReplyToAddress = scope.AppliesToAddress + “/Default.aspx”;
return scope;
}
That was pure cut & paste; the same holds for the next fragment, however in this case we’ll dig a bit deeper in how the code works.
protected override IClaimsIdentity GetOutputClaimsIdentity(IClaimsPrincipal principal, RequestSecurityToken request, Scope scope)
{
ClaimsIdentity outputIdentity = new ClaimsIdentity();if (null == principal)
{
throw new InvalidRequestException(“The caller’s principal is null.”);
}outputIdentity.Claims.Add(new Claim(System.IdentityModel.Claims.ClaimTypes.Name, principal.Identity.Name));
return outputIdentity;
}
}
GetOutputClaimsIdentity is the method that we can use for customizing the identity info in the token that we will send to the third party website. To be super clear, with “customizing” i mean deciding on the information about the user we want to package in our output token for making them available on the third party website. In the scenario we described so far, the shampoo shop is just interested in verifying that the user is indeed a member of our club: for doing that we don’t really need to pack any info in the token, the sheer fact that the user was able to obtain a token from us is enough. However we’ll add some info anyway, just in case: specifically, we are packing in the Name attribute of the user. Later we will get back to this point, and you’ll understand why we use the term Claim so pervasively in the code above.
We are almost done with the issuing logic! We just need to add a last cs file, MembershipSTSConfiguration:

Again, the code is coming straight from the SDK samples: its only purpose is tying our custom STS with the specific aspects of our deployment (certificates, etc).
using System;
using System.Data;
using System.Configuration;
using System.Linq;
using System.Web;
using System.Web.Security;
using System.Web.UI;
using System.Web.UI.HtmlControls;
using System.Web.UI.WebControls;
using System.Web.UI.WebControls.WebParts;
using System.Xml.Linq;
using Microsoft.IdentityModel.Configuration;
using Microsoft.IdentityModel.SecurityTokenService;
using System.Security.Cryptography.X509Certificates;/// <summary>
/// A custom SecurityTokenServiceConfiguration implementation.
/// </summary>
public class MembershipSTSConfiguration : SecurityTokenServiceConfiguration
{
const string issuerName = “MembershipSTS”;
const string SigningCertificateName = “CN=localhost”;/// <summary>
/// MembershipSTSConfiguration constructor.
/// </summary>
public MembershipSTSConfiguration()
: base(issuerName, new X509SigningCredentials(CertificateUtil.GetCertificate(StoreName.My, StoreLocation.LocalMachine, SigningCertificateName)))
{
this.SecurityTokenService = typeof(MembershipSTS);
}
}
Alrighty, now we have all the necessaire for issuing tokens for our users: how do we tie this code back to the page we added? Simple: Geneva Framework offers a control, FederatedPassiveTokenService, which can do just that. Let’s drag it from the toolbox to the new page:
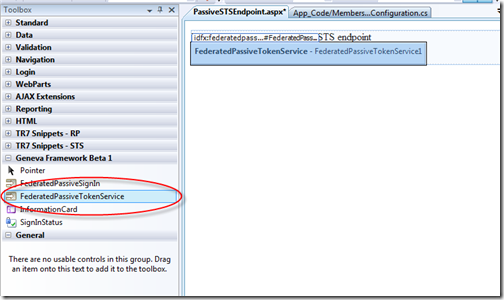
If you select the control and hit F4, you’ll get the control properties page: here you just specify the custom classes we want to use when servicing requests, and we are done.
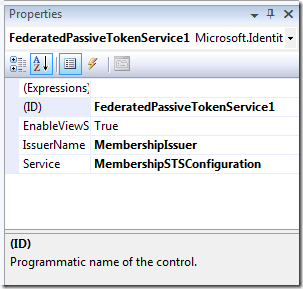
That’s it, you don’t need anything else: your website is now capable of behaving as an identity provider.
I promised no rip & replace would have been necessary, and I kept my promise. Your users will continue to experience your website as always, NOTHING has changed: they’ll still use the membership authentication as usual. However, now your authentication logic can also be invoked as a service from third party websites: in the next section we will build such a site.
Configuring a website for consuming identities from our IP
Let’s create a simple website for our online shampoo shop. In honor of Tom’s Rhinoplastic, I’ll call it Tom’s Shampoo House.

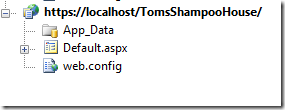
That’s a nice default ASP.NET website. After adding some visual elements for recognizing the pages, let’s focus on adding to the website the ability of recognizing members of the HA Club.
The idea behind it is real simple: in our shop website, a user is authenticated only if he/she successfully authenticated with the club site. If the incoming user is unauthenticated, we redirect him/her to the club STS page; here there is the necessary logic for allowing the user to authenticate, certify the successful authentication by isusing a token, and coming back to the shop website which will finally accept the user.
The trick is that all that redirect dance happens automagically, thanks to the geneva framework: we just need to feed it with few initial details.
If we’d be using an “official” STS, enabling our web shop to accept & process its identities would be a breeze: literally a matter of walking though the screens of a simple wizard. That would be thank to the fact that the STS would be describing its capabilities in a machine-readable format, which we call metadata. Few weeks ago I posted an article which shows just that.
Unfortunately our handmade STS does not expose metadata, hence we can’t use the wizard and we need to configure our website manually. You’ll see that it’s really straightforward.
First thing, we drag a SignInStatus control on the main page: that’s not strictly necessary, but it will be useful to sign out explicitly if we want to flush a session cookie (usual ASP.NET session).
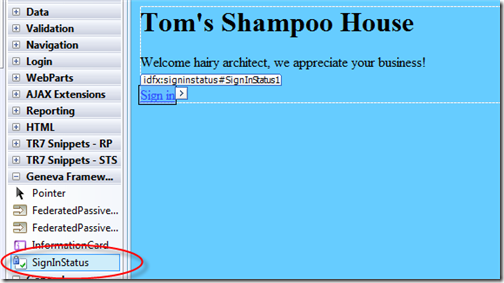
Then all it’s left to do is working on the site’s web.config so that Geneva Framework is inserted in the processing pipeline and allowed to work its redirecting & verification magic. Again, remember that usually all this would be made automagically for you as described here.
First, let’s add the Geneva Framework config element among the known config sections:
…

<configSections>

        <!– Registers the microsoft.IdentityModel configuration section –>

        <section name=”microsoft.identityModel” type=”Microsoft.IdentityModel.Configuration.MicrosoftIdentityModelSection, Microsoft.IdentityModel, Version=0.5.1.0, Culture=neutral, PublicKeyToken=31bf3856ad364e35″/>

        <sectionGroup name=”…
Then, we need to set the right authentication mode. For ASP.NET, that’s None; Geneva Framework will take ownership of the authentication processing.
<authentication mode=”None”/>

<authorization>

    <deny users=”?”/>

</authorization>
The next step inserts 2 new HttpModules in the pipeline. WSFederationAuthenticationModule takes care of handling all the redirects required by the protocol, while SessionAuthenticationModule takes care of establishing and managing sessions. Remember, when you use the wizard (which BTW we call FedUtil) all those details are hidden from you: and even now, you don’t really need to understand those 2 lines for pasting them here.
<!– Register SessionAuthenticationModule in IIS6 classic ASP.Net apps –>

<add name=”SessionAuthenticationModule” type=”Microsoft.IdentityModel.Web.SessionAuthenticationModule, Microsoft.IdentityModel, Version=0.5.1.0, Culture=neutral, PublicKeyToken=31bf3856ad364e35″/>

<!– Register WSFederatedAuthenticationModule in IIS6 classic ASP.Net apps –>

<add name=”WSFederationAuthenticationModule” type=”Microsoft.IdentityModel.Web.WSFederationAuthenticationModule, Microsoft.IdentityModel, Version=0.5.1.0, Culture=neutral, PublicKeyToken=31bf3856ad364e35″/>

tpModules>

The code above added the modules within the system.web section, as required by pre-IIS7 applications. In order to do the same for IIS7 we need to add the following two lines in bold:
<system.webServer>

    <validation validateIntegratedModeConfiguration=”false”/>

    <modules>

        <remove name=”ScriptModule”/>

        <add name=”ScriptModule” preCondition=”managedHandler” type=”System.Web.Handlers.ScriptModule, System.Web.Extensions, Version=3.5.0.0, Culture=neutral, PublicKeyToken=31BF3856AD364E35″/>

        <add name=”SessionAuthenticationModule” type=”Microsoft.IdentityModel.Web.SessionAuthenticationModule, Microsoft.IdentityModel, Version=0.5.1.0, Culture=neutral, PublicKeyToken=31bf3856ad364e35″/>

        <add name=”WSFederationAuthenticationModule” type=”Microsoft.IdentityModel.Web.WSFederationAuthenticationModule, Microsoft.IdentityModel, Version=0.5.1.0, Culture=neutral, PublicKeyToken=31bf3856ad364e35″ preCondition=”managedHandler”/>

    </modules>
All we have done so far made sure that geneva framework is in the pipeline; that’s boilerplate code, that you’d (almost) always add “as is” regardless of the application. The following is the config section in which we give the config parameters that are specific to our application.
<microsoft.identityModel>

        <issuerNameRegistry type=”Microsoft.IdentityModel.Tokens.ConfigurationBasedIssuerNameRegistry”>

            <trustedIssuers>

                <add thumbprint=”6170D17A295D9C2CA7BE7A1ED42861687AE6EE75″ name=”CN=localhost”/>

            </trustedIssuers>

        </issuerNameRegistry>

        <audienceUris>

            <add value=”https://localhost/TomsShampooHouse/”/>

        </audienceUris>

        <federatedAuthentication enabled=”true”>

            <wsFederation passiveRedirectEnabled=”true”
              issuer=”https://localhost/HairyArchitectClub_MembershipSample/PassiveSTSEndpoint.aspx”
              realm=”https://localhost/TomsShampooHouse/”>

            </wsFederation>

        </federatedAuthentication>

        <serviceCertificate>

            <certificateReference x509FindType=”FindBySubjectName” findValue=”localhost” storeLocation=”LocalMachine” storeName=”My”/>

        </serviceCertificate>

    </microsoft.identityModel>

</configuration>
Did I mention that all this can be autogenerated using a wizard? Ah, I did? Sorry about that, as I get old I repeat myself 😉
I won’t give you all the details about the element above (at least today), however I would like to focus your attention on the lines in bold. That is the point in which we say that our website wants identity tokens from the STS of the HA club (the issuer) and that those tokens should be issued for our shampoo shop site (the realm). Everything else has to do with mechanics.
That’s about it. Our shampoo shop website is ready for a spin.
Accessing Tom’s Shampoo House with your HA club identity
Let’s open a browser, type https://localhost/TomsShampooHouse/ in the address bar and hit enter.

Surprise surprise, we are redirected to the HA club login page! How did that happen? The httpmodules at TomsShampooHouse found that we were unauthenticated, hence redirected us to the passiveSTSEndpoint.aspx page on the club website. The club website, however, also found us unauthenticated hence the membership configuration kicked in. Let’s enter our credentials, hit Log In and see what happens.
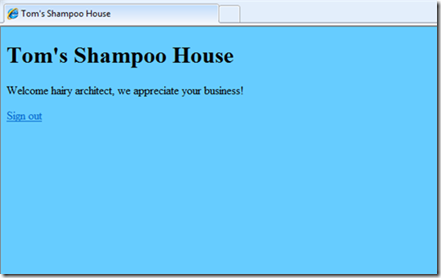
Voila’, we land on the home page of TomsShampooHouse as authenticated users coming from the HA club! Again, how did that happen? Once we successfully authenticated via the membership provider, we got access to the STS page on the HA club website; here the FederatedPassiveTokenService control took care of invoking the token issuance code and redirect us to our realm, TomsShampooHouse, where we verified that the token was coming from the right place and finally allowed the user in.
Needless to say, you don’t really need to grok all those redirects for taking advantage of the system. All you need to know is the members of the HA club have now an easy way of using their club identity with third party websites, and that it is really easy for a third party website to request & process identities coming from the HA club. TomsShampooHouse has no credentials store to speak of, and relies exclusively on the credentials verification step done by the HA club. That’s an epic win. Of course this is not the only possible scenario, but it certainly gives some idea about the possibilities offered by the approach.
Another thing worth pointing out: if a user would be already signed in the HA club, and would follow a link to the TomsShampooHouse home page, what would you expect would happen? That’s riiight, single sign on! The redirects described above would still happen, but this time the user would be already authenticated when accessing the STS page hence he’d glide straight into TomsShampooHouse without having to enter his credentials again. That’s a pretty awesome side effect!
Adding Claims into the Mix
Alrighty, what we did is already pretty spectacular: TomsShampooHouse can now count on a user population that is much more likely to spend a lot in shampoo than the average internet surfer, and all this without having to enter in the nasty business of handling credentials.
However, we can do even more. Every member of the HA club belongs to a certain role, which somehow reflects the length of his hair. Now that’s an information that TomsShapmooHouse would like to have about the current user! That would allow targeted ads & offerings, boosting further the probability of making a sale. Let’s forget for a moment the considerations about privacy & user consent (I’ll get to that at he end of the post), and let’s concentrate on the technical aspects. Is the above possible? Can TomsShampooHouse tap into HA’ Club’s knowledge of its members attributes and have even more info about the current user, while still staying away from managing that info or having to keep it synchronized? Most certainly.
Remember when we added an STS to the HA Club website? One of the moving parts we had to define was the method GetOutputClaimsIdentity: at the time we saw that Geneva Framework offers a mechanism for adding to the output tokens information about the user, but we decided that we didn’t need to add any since the token itself was enough for a member to prove its affiliation with the HA club. Well, now the matter is different: TomsShampooHouse would like to assess the hair length of its incoming user, and the HA Club 1) knows it and 2) is considered by TomsShampooHouse a reliable source for that specific information. In this case, hair length is a paradigmatic example of claim: an assertion about an entity (the club member) made by another entity (in this case, the HA club). In essence, the ability of issuing such claims is what makes the HA Club an identity provider. Code-wise, that’s trivial: we just go back to HA Club’s MembershipSTS.cs and augment its GetOutputClaimsIdentity with the lines in bold below:
protected override IClaimsIdentity GetOutputClaimsIdentity(IClaimsPrincipal principal, RequestSecurityToken request, Scope scope)
{
ClaimsIdentity outputIdentity = new ClaimsIdentity();if (null == principal)
{
throw new InvalidRequestException(“The caller’s principal is null.”);
}outputIdentity.Claims.Add(new Claim(System.IdentityModel.Claims.ClaimTypes.Name, principal.Identity.Name));
string[] rRoles = Roles.GetRolesForUser();
IEnumerable<Claim> roleClaims = from claim in principal.Identities[0].Claims
where claim.ClaimType == ClaimTypes.Role
select claim;
foreach (string role in rRoles)
{
outputIdentity.Claims.Add(new Claim(Microsoft.IdentityModel.Claims.ClaimTypes.Role, role));
}
return outputIdentity;
}
Note: In this case we are leveraging the fact that the HA club is using the ASP.NET role manager for storing roles which are tied to the info we want: if we’d be getting infro from a less hair-centric entity, this would probably reside in an attribute rather than a role.
Now we know that the tokens issued by the HA club will contain this extra information: TomsShampooHouse just need do add logic that takes advantage of it. Let’s say that we want to add a promo message in the home page, and target it according to the user’s characteristics. We start by dragging in a label:
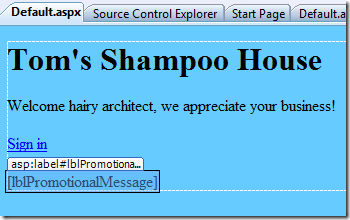
Then we add some code in the page_load that will adapt the message to the name of the user and the product that fits best his features:
protected void Page_Load(object sender, EventArgs e)
{
string promotionalMessage =
“Dear “ + User.Identity.Name + “, can we interest you in “;IClaimsIdentity claimsIdentity = ((IClaimsPrincipal)(Thread.CurrentPrincipal)).Identities[0];
string firstrole = (from c in claimsIdentity.Claims
where c.ClaimType == Microsoft.IdentityModel.Claims.ClaimTypes.Role
select c.Value).FirstOrDefault();
switch (firstrole)
{
case “bangs”: promotionalMessage += “our miraculous growth stimulator shampoo?”; break;
case “ponytail”: promotionalMessage +=“our selection of har bands?”; break;
case “chewbacca”: promotionalMessage +=“our 4-gallons shampoo & body bottle?”; break;
default: promotionalMessage +=“our month special?”; break;
}
lblPromotionalMessage.Text = promotionalMessage;
}
As you can see, the code for extracting those info is STILL completely free from any reference to the authentication protocol used, the credential technology involved or any other consideration other pure business rules. The application takes advantage of identity information, but it does to without forcing the developer to learn anything outside of his/her comfort zone.
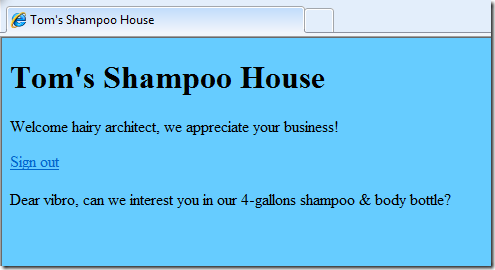
If we give the app a spin, we’ll be prompted as usual by the HA club membership provider page: and once we’ll be redirected to TomsShampooHouse, we’ll be greeted by a personalized message which appeals to our likely tastes. Now THAT’s context 🙂
Summary & considerations
The sample here may be silly, but the pattern it demonstrates is seriously powerful.
We have shown that if you have an existing website with an existing credential management system, you can easily offer your users the possibility of using their identities of customers of yours also elsewhere, for example on the websites of your commercial partners. If you happen to have read the book, you can say that you can free their hostage identities 🙂
From the technical perspective, extending your existing website with this capability is as easy as adding a new web page and some code behind it: no rip & replace required, nor disruption of the current user experience of your website if you don’t want to (though giving it a thought can���t hurt ;-)). Consuming those identities from a third party website is even simpler: in this post I have shown how to set up things manually, but in some future installments I’ll demonstrate how you can cut down dramatically those steps if only you use metadata.
The advantages are big for everyone: you give your users more reason to use your website, your partner gets precious functionalities (authentication) and info (claims) without big investments in infrastructure, and both of you may even get SSO transitions. The advantages for the users lie in their ability of taking advantage of more services without cranking up their involvement (ie new credentials, new profiles, and so on). However there is an important consideration to be done here. Fully passive protocols like the one used in this example do not really put the user in control of the information being sent, if not in indirect ways (ie the HA club may have a consent form where a member can choose which info can be shared with TomsShampooHouse). There are ways of having it all, that is to say augmenting the website with an STS without imposing any rip&replace while still putting the end user in control of the claims flow: one example would be to add to the existing website an ACTIVE STS, and invoke it via cardspace instead of via browser redirects. Both methods have merits, and the relative weight of those in respect to the disadvantages is usually heavily influenced by the nature of the scenario (ie end user & public internet vs employees & federated partners). In some future post I’ll show the active approach too.
I’ll leave you with a couple of extra considerations:
- What you have seen here may enable your membership based website to take advantage of services such as the .NET Access Control service: an extra page, few classes and all of a sudden all your users can access whatever application is configured to trust the ACS service. That’s REALLY powerful.
- Here we used an ASP.NET membership based sample, but I am sure you realized that this may work with ANY website authentication scheme. If the passive STS is just a page on a website, trying to access it will trigger whatever authentication scheme protects your website: once you are authenticated, the passive STS control takes care of invoking whatever issuance logic you have chosen and sends back the requested token via http redirect
Any “a-ha” moment yet? 🙂 as usual, feel free to drop a line for clarification

can u explain me how can I implement membership object in sts on .net 2010.Actully, I have implement one program but it throws error .I think might be its unable to reach token key.