An Identity Provider and its STS: writing a custom STS with the October Beta of the Geneva Framework
[Disclaimer(): base() { this blog is NOT the source of the official guidance on the Geneva products. Please always check out the Geneva team blog for hearing directly from the product group} ]
In the former installment I blabbered a bit about how an STS is a serious matter, and I can almost visualize you politely listening while waiting for the thing you really want to hear about: how to write an STS with the Geneva Framework. Fine, I’ll get to it already 🙂 just promise me you’ll at least consider those points a bit before making any rush decision.
The token issuance process
The idea behind the Issue method of an STS is easy enough. You get a request in, secured by some token; you process the request, and if you are satisfied you render a token compliant with the request and you send it back in a response. Even without taking into account complications such as delegation and similar, we need to go way deeper if we want to get any useful indication about what we need to do to make the whole issuance magic happen. Here there’s a list, as usual far from being exhaustive:
- Pick a protocol. Remember the factors listed in the former post. Do you want your STS to be called via Ws-Trust? WS-Federation? SAML-P?
- Choose protocol hosting. At the end of the day, whatever concoction you come out with needs to have an endpoint of some sort and some activation criteria so that requests can be routed to your classes and processed. Talking about the Windows world: do you need a page that can be called via redirects? A message-activated web service in IIS or WAS? A service in your won executable?
- Handle RST message. Let me use RST, WS-trust terminology, for indicating all token issuance requests. Your requests will follow a specific syntax, which your system needs to be able to parse, interpret and hopefully filter for making the relevant info (ie, which claims are being requested; for which RP; and so on) available to the subsequent logic down the pipeline.
- Validate. Giving out a token is serious business. Before deciding to issue one, many factors need to be examined for compliance with various criteria: here there are few examples. Note that I am not getting into the validate vs authenticate debacle, since I’d like to post this before midnight; we’ll do that some other time.
- Integrity. We need to check all the signatures, from the message itself to the single tokens. Of course if there are encrypted parts we need to take care of that too
- Issuer. Do we trust the issuer of the tokens that are protecting the RST? Those can go from the CA who issued the X509 that was used to secure the call, to the authority that emitted an issued token if that was the RST authentication method of choice (FP); in any case, we need some criteria (belonging to a list being the most common) for deciding if we trust the issuer of the incoming token
- Intended RP (AppliesTo). Normally we want to know who is the RP with whom the requestor intend to use our soon-to-be-issued token: perhaps we want to make sure that it’s a federated partner of ours, perhaps we have some logic that we need to apply which is associated to the intended RP (ie verifying if the RP is a merchant in a country that is currently under embargo). This check is often implemented by comparing the intended RP with a predetermined list. Note: it is also possible that, for privacy reasons, we may not want our STS to know anything at all about the intended RP: the model allows for it, we just avoid asking for that info and we skip this validation step. If you come from the cardspace world you may be under the impression that this non-auditing mode is the rule: in fact, it is the exception. In the vast majority of cases verifying the identity of the intended RP is a best practice, and you need very strong motives (such as privacy sensitive data and intended usage) for skipping it.
- Requestor. Who is requesting the token? Does it/he/she have a right to obtain a token of the form requested? This usually boils down to verifying the credentials transported/referred by the incoming token, which of course is heavily dependent on the token format itself and the authentication store against which the check must take place.
- [for FPs] Set of accepted claims. If your STS is used for implementing an FP, chances are that the incoming token will contain claims that you want to process. Before you do that, however, you have to make sure that you consider only those claims for which you deem the issuing authority competent. In other words: if an RST is secured by a token coming from a bank, we expect it to contain claims such as account number or latest balance; but if we’d find a blood type claim in there, we should make sure that such a claim does not make it further down the processing pipeline since it’s not an attribute for which we trust the bank to be authoritative about.
- Prepare crypto info. The issued token will have to be signed and is likely to be encrypted too
- Signing key. Which key should be used for signing outgoing token? That’s an answer we need to give for being able to issue
- RP encryption key. If we choose so, and if we are operating in auditing mode, we can encrypt the token for the intended RP. The same list mentioned in 4.3 can be used for storing the certs of every known RP. Keeping that updated may be less than trivial: a product may do that for you, but if you choose the custom STS route you’re on your own
- Retrieve attributes and express them in claim form. This is the essence of being an identity provider. You need to interpret the RST for understanding which claims are needed (both explicitly requested or implied by the intended RP), then youneed to retrieve the values from your attributes store(s) and express those in claim format in the half-baked token you are in the process of issuing
- [For FPs] execute claims transformation logic. If you are an FP, rather than injecting attributes values from external sources you’ll likely use the values of incoming claims for calculating the values of the outgoing ones
- Generate RSTR(C). Once everything has being said and done, you need to package your issued tokens and send it back to the requestor in the format imposed by the protocol you’ve picked in 1
Apart from the few indications I’ve given in the protocol hosting step, this is a list that holds regardless of the target platform. Some will be taken aback by its complexity, some will frown upon the gross oversimplifications I’ve made here and there: isn’t my job interesting? 🙂 Aanyway, now that we have some idea of how things work let’s move to consider how to use Geneva Framework for implementing the above.
Writing an STS with the Geneva Framework: classes and the Issue flow
Some of the steps in the list above can be handled directly by the geneva framework: typically all the protocol handling, parsing, crypto execution and the like are things that the platform can take care of on your behalf. Other things, such as attributes retrieval or custom credentials verification, are left to you so that you can inject your custom logic and model the STS behavior according to your specific needs.
At the core, writing a custom STS with the Geneva Framework means deriving from the SecurityTokenService class. Overriding the GetOutputClaimsIdentity method provides the hook for injecting custom logic for claim values retrieval and/or transformation (step 6 and 7); the GetScope method override is the place where RP validation (step 3) and preparation of the signing & encrypting info (step 5) can take place. Custom authentication logic (step 4.4) can be injected in the request processing pipeline by providing a custom SecurityTokenHandler: and a list of the valid issuers (4.2) can be provided by deriving from IssuerNameRegistry. In many circumstances, the set of accepted claims can be filtered by providing an implementation of ClaimsAuthenticationManager. Most of those classes can be added in the processing pipeline at runtime, via the configuration element microsoft.identityModel, so that the authentication criteria or the list of trusted issuers can easily be changes for a deployed instance of STS without requiring recompilation. All of the above are pretty much independent from the protocol hosting choices: that means that those classes represent a unified programming model that works both for active and passive cases without requiring rewrites. Neat!
Now, that was pretty condensed. For making you understand how the above works, I’ll walk you though an example.
Let’s say that you have a set of user attributes in a custom store; and that every user of yours have a smartcard, that you can authenticate against another custom store where you keep all the corresponding cert thumbprints. You’d like to allow your users to use an information card for sharing with web RPs the attributes you store for them. In order to enable that scenario, you:
- issue to them an information card, backed by their smartcard, which contains in form of claims the attributes schema of choice
- set up an STS which understands RSTs originated by using the above information card
I have tackled 1 in an old post about Zermatt, and that code still works today; hence let’s explore in detail how we can use the Geneva Framework for implementing 2. Here I could really use an animation, which is in fact what I’ve used during my session at TechEd: I’ll try to recreate the effect by taking snapshots.
Here there’s the situation: there is a web RP, and our requestor is cardspace; hence we’ll need a WS-Trust STS. We have our custom authentication and attributes stores. Here there’s how the situation looks like:

We said we need an active STS. I’m not a big fan of maintaining my own host, so we’ll host in in IIS. For the time being this is just a classic WCF service, hence our activation mechanism involves a .svc file. If we would be implementing a passive STS, instead of the .svc file we would be working directly with pages.
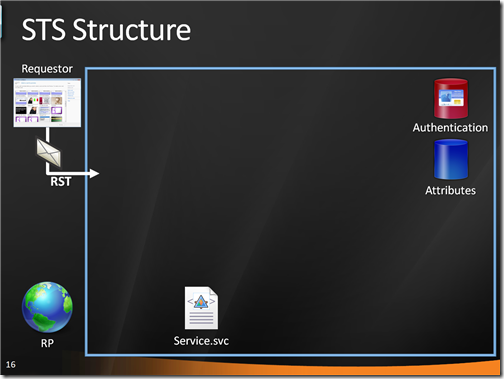
The .svc file uses a factory for initializing our service. Namely, it uses WSTrustServiceHostFactory which comes with Geneva Framework and it is used when you want to control the STS binding directly via config. The service class we use derives from SecurityTokenServiceConfig, an intermediate class which binds to an address a specific instance of securitytokenservice.
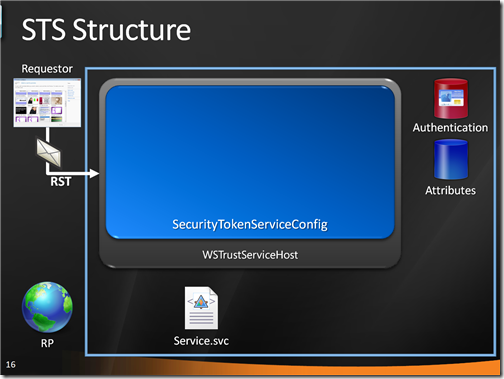
Our SecurityTokenServiceConfig creates an instance of its SecurityTokenService class, which in turn goes straight to the web.config searching for any indications in the microsoft,.identityModel element.
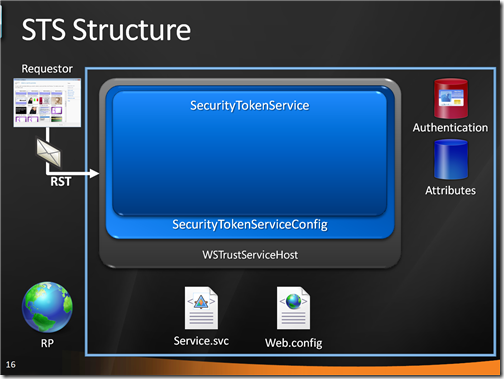
In this case, the config contains a reference to an IssuerNameRegistry type and a custom SecurityTokenHandler type: it instantiate them in the pipeline, and begins the processing.
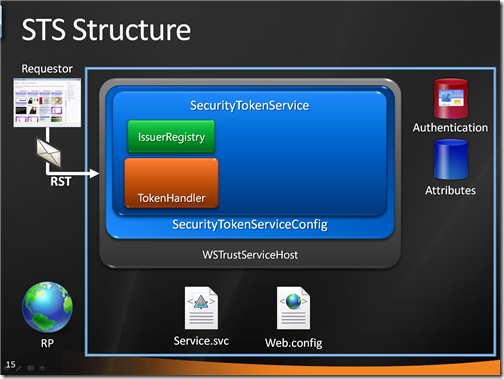
The first thing to be executed is the IssuerNameRegistry logic: in this case, it is just a check that verifies if the issuer of the incoming token (the CA who issued the certificate in the user’s smartcard) belongs to a custom list of trusted issuers:
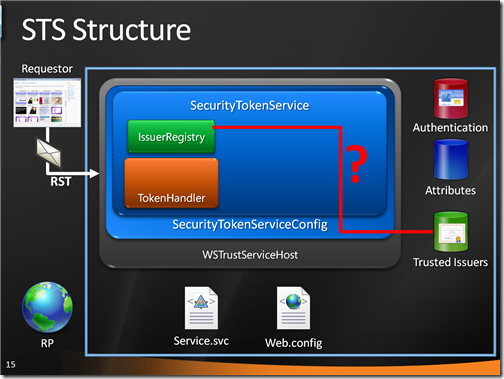
The the custom SecurityTokenHandler comes into play. In this case it is a subclass of X509SecurityTokenHandler: a call to base() takes care of all the low level checks (integrity etc), after which the custom logic looks up the thumbprint of the certificate in the custom authentication store and blocks the request if it turns out that the smartcard does not belong to the list:
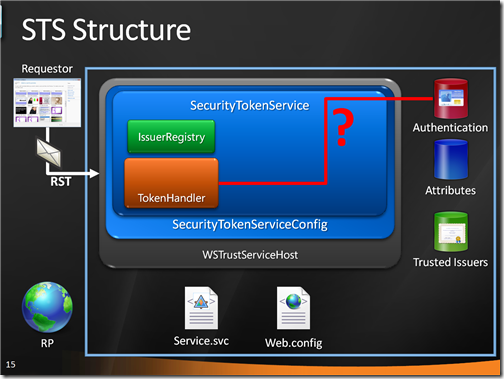
If all the validations concluded successfully, the execution passes to the GetScope method which validates the incoming RP (by verifying it belongs to a predetermined list) and prepares all the necessary crypto info (singing key, RP cert form encryption):
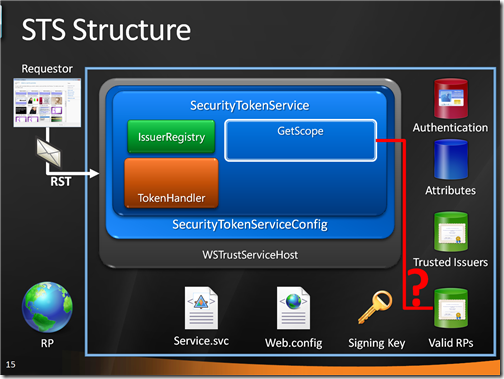
Finally, the execution reaches GetOutputClaimsIdentity: here we execute our claim retrieval logic.
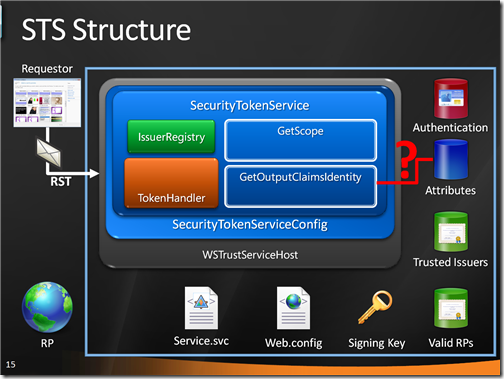
At this point the Geneva Framework has all it needs to generating a token with the info we want and send it back in a RSTR (in fact a RSTRC, but nevermind).
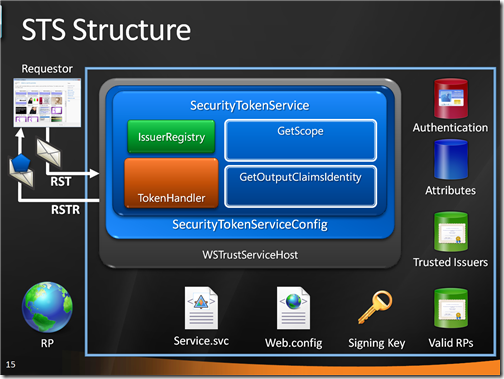
I hope that this helped to clarify the flow: it is pretty specific to the protocol hosting I’ve chosen here, and it does not show anything of the FP role, but that should give you an idea of how this works.
A closer look in Visual Studio
Let’s put the above in practice in Visual Studio.
The STS
Our STS is a simple website project:
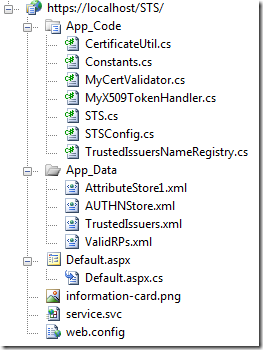
Let’s take a look at the various pieces.
Stores
For making things slightly more realistic than the usual hardcoded samples, I’ve added few fake stores representing those elements that are likely to live outside our code in a real situation.
Our sample attributes store goes as follows:
<?xml version=”1.0″ encoding=”utf-8″ ?>

<AttributesStore1>

  <Citizen ID=”Vittorio Bertocci”>

    <Attribute Uri=”http://schemas.xmlsoap.org/ws/2005/05/identity/claims/givenname”

               Value=”Vittorio” />

    <Attribute Uri=”http://schemas.xmlsoap.org/ws/2005/05/identity/claims/dateofbirth”

               Value=”XX/XX/XX” />

    <Attribute Uri=”http://schemas.xmlsoap.org/ws/2005/05/identity/claims/name”

               Value=”Vittorio Bertocci” />

    <Attribute Uri=”http://www.maseghepensu.it/hairlenght”

               Value=”50″ />

  </Citizen>

</AttributesStore1>
This is our custom authentication store:
<?xml version=”1.0″ encoding=”utf-8″ ?>

<AUTHNStore>

  <Entry Thumbprint=”UwRtSX77GS5pZio2EGbK5KyNtAQ=” ID=”Vittorio Bertocci”/>

</AUTHNStore>
Finally, this is our trusted issuers store; the ValidRPs store is similar.
<?xml version=”1.0″ encoding=”utf-8″ ?>

<TrustedIssuers>

  <Issuer SubjectName=”CN=localhost”/>

  <Issuer SubjectName=”CN=Microsoft CA”/>

</TrustedIssuers>
Needless to say, and like for everything else I write here, NONE of this is even remotely ready for production use: those are just samples for making a point. Also note that I modify things here and there (birth dates, issuer names, thumbprints) in the name of my paranoia ehmm, I mean professional bias.
Validation & Token Issuance logic
That’s the meaty part. Let’s follow roughly the same order as the issue flow explanation. First, there there’s our service.svc file:
<%@ ServiceHost

    Factory=“Microsoft.IdentityModel.Protocols.WSTrust.WSTrustServiceHostFactory”

    Language=“c#” Service=“STSConfig” %>
Our service class is STSConfig. Let’s take a look to STSConfig.cs:
//STSConfig.cs
using System.Security.Cryptography.X509Certificates;
using Microsoft.IdentityModel.Configuration;
using Microsoft.IdentityModel.SecurityTokenService;public class STSConfig : SecurityTokenServiceConfiguration
{
public const string issuerAddress = “http://localhost/STS/Service.svc”;public STSConfig()
: base(issuerAddress, new X509SigningCredentials(CertificateUtil.GetCertificate(StoreName.My, StoreLocation.LocalMachine, “CN=localhost”)))
{
SecurityTokenService = typeof(STS);
}
}
Again, nothing strange here. Note, new in Geneva Framework: adding signing credentials here does not imply that those will be automatically be used: we will have to explicitly select those in GeScope.
Before we get to the STS class, our custom STS, let’s go to take a look in the config to see what else we’ll need to load:
…
<system.serviceModel>
<services>
<service name=”Microsoft.IdentityModel.Protocols.WSTrust.WSTrustServiceContract”
behaviorConfiguration=”MySTSBehavior”>
<endpoint address=””
binding=”customBinding”
bindingConfiguration=”X509Binding”
contract=”Microsoft.IdentityModel.Protocols.WSTrust.IWSTrustFeb2005SyncContract”/>
<endpoint address=”https://localhost/STS/service.svc/Mex” binding=”mexHttpsBinding” contract=”IMetadataExchange”/>
</service>
</services>
<bindings>
<customBinding>
<binding name=”X509Binding”>
<security authenticationMode=”MutualCertificate” />
<httpTransport />
</binding>
</customBinding>
</bindings>
<behaviors>
<serviceBehaviors>
<behavior name=”MySTSBehavior”>
<serviceMetadata httpGetEnabled=”true”/>
<serviceDebug includeExceptionDetailInFaults=”true”/>
<serviceCredentials>
<serviceCertificate findValue=”localhost”
storeLocation=”LocalMachine”
storeName=”My”
x509FindType=”FindBySubjectName” /><issuedTokenAuthentication allowUntrustedRsaIssuers=”true” />
</serviceCredentials>
</behavior>
</serviceBehaviors>
</behaviors>
</system.serviceModel><microsoft.identityModel>
<issuerNameRegistry type=”TrustedIssuerNameRegistry” />
<securityTokenHandlers>
<remove type=”Microsoft.IdentityModel.Tokens.X509SecurityTokenHandler”/>
<add type=”MyX509TokenHandler”/>
</securityTokenHandlers>
</microsoft.identityModel>
</configuration>
I have spared you the entire web.config, and shown just the system.serviceModel (where we have our STS binding, which uses MutualCertificate) and the microsoft.identityModel elements. In the latter we refer to two custom classes, TrustedIssuerNameRegistry and MyX509TokenHandler. Admittedly I could have chosen better names… aaanyway, let’s take a peek to TrustedIssuerNameRegistry.cs:
using System.Linq;
using System.IdentityModel.Tokens;
using Microsoft.IdentityModel.Tokens;
using System.Xml.Linq;
using System.Collections.Generic;public class TrustedIssuerNameRegistry : IssuerNameRegistry
{
public override string GetIssuerName(SecurityToken securityToken)
{
X509SecurityToken x509Token = securityToken as X509SecurityToken;
if (x509Token != null)
{
XElement root = XElement.Load(Constants.TrustedIssuersStorePath);
IEnumerable<XElement> entry =
from el in root.Elements(“Issuer”)
where (string)el.Attribute(“SubjectName”) == x509Token.Certificate.SubjectName.Name
select el;
if (entry.Count() != 0)
{
return x509Token.Certificate.SubjectName.Name;
}
}throw new SecurityTokenException(“Untrusted issuer.: “ + x509Token.Certificate.SubjectName.Name);
}
}
That’s how an IssuerNameRegistry works: you override GetIssuerName. If you are happy with the issuer of the incoming security token you return its name, otherwise you throw. Here I just query my trusted issuers XML file and if I find the issuer in there I’m happy.
Now let’s take a look at MyX509TokenHandler.cs: we expect to find the user authentication logic in here.
using Microsoft.IdentityModel.Tokens;public class MyX509TokenHandler: X509SecurityTokenHandler
{
public MyX509TokenHandler(): base(new MyCertValidator())
{}
}
using System.Collections.Generic;
using System.Linq;
using System.IdentityModel.Selectors;
using Microsoft.IdentityModel.SecurityTokenService;
using System.Xml.Linq;public class MyCertValidator: X509CertificateValidator
{
public override void Validate(System.Security.Cryptography.X509Certificates.X509Certificate2 certificate)
{
string certThumb = System.Convert.ToBase64String(certificate.GetCertHash());XElement root = XElement.Load(Constants.AUTHNStorePath);
IEnumerable<XElement> entry =
from el in root.Elements(“Entry”)
where (string)el.Attribute(“Thumbprint”) == certThumb
select el;
if(entry.Count()==0)
{
throw new FailedAuthenticationException(“The certificate credentials you presented are not recognized.”);
}
}
}
Ah, that’s more like it. Here we take the incoming certificate and we verify that its thumbprint is listed in our authentication store; pretty straightforward.
In fact, I could have injected my custom x509certificatevalidator without having to provide a custom token validator: however I believe that this approach is more didactic, since that would have been biased toward the choice of using x509 in this specific example while in general for other authentication factors you can expect to have to modify the token validator.
Ok, we can finally take a look at the main course: our custom STS class in STS.cs. Let’s do it in pieces.
//STS.cs
using System.Collections.Generic;
using System.Security.Cryptography.X509Certificates;
using System.ServiceModel;using Microsoft.IdentityModel.Claims;
using Microsoft.IdentityModel.Configuration;using Microsoft.IdentityModel.SecurityTokenService;
using System.Linq;
using System.Xml.Linq;
using System;public class STS : SecurityTokenService
{
public STS(SecurityTokenServiceConfiguration config)
: base(config)
{
}#region Overrides
protected override Scope GetScope(IClaimsPrincipal principal, RequestSecurityToken request)
{
//GetScope –
//base
Scope scope = new Scope(request);
scope.SigningCredentials = SecurityTokenServiceConfiguration.SigningCredentials;
//checks if we are happy with the intended RP
ValidateAppliesTo(request.AppliesTo);
//retrieves the corresponding cert and embeds it in the scope
string RPhostname = request.AppliesTo.Uri.Host;
scope.EncryptingCredentials = new X509EncryptingCredentials(CertificateUtil.GetCertificate(StoreName.My, StoreLocation.LocalMachine, “CN=” + RPhostname));return scope;
}
The first area worth analyzing is GetScope. Here we set explicitly the signing credentials we added in the STSConfig, we verify that we are happy with the RP and we retrieve the corresponding encryption certificate using a little naming trick. The RP validation logic is as follows:
void ValidateAppliesTo(EndpointAddress appliesTo)
{
if (appliesTo == null)
{
throw new InvalidRequestException(“The appliesTo cannot be null when requesting a token to this STS.”);
}XElement root = XElement.Load(Constants.ValidRPsStorePath);
IEnumerable<XElement> entry =
from el in root.Elements(“RP”)
where (string)el.Attribute(“AbsoluteUri”) == appliesTo.Uri.AbsoluteUri
select el;
if (entry.Count() == 0)
{
throw new InvalidRequestException(String.Format(“{0} is not a recognized RP”, appliesTo.Uri.AbsoluteUri));
}
}
If we don’t find a non null appliesTo we get upset; then, as usual, we just look it up in our validRP store (and we throw if we don’t find it).
The GetOutputClaimsIdentity is not especially interesting:
protected override IClaimsIdentity GetOutputClaimsIdentity(IClaimsPrincipal principal, RequestSecurityToken request, Scope scope)
{XElement attributeSet = GetClaimValueSet(principal.Identity.Name);
//goes through the list of requyested claims and retrieves the corresponding values from the stores
List<Claim> claims = new List<Claim>();
foreach (RequestClaim requestClaim in request.Claims)
{
claims.Add(new Claim(requestClaim.ClaimType,
RetrieveClaimValue(attributeSet,requestClaim.ClaimType) ));
}return new ClaimsIdentity(claims);
}
Given the incoming principal, we “prefetch” the entire attribute set for that user via GetClaimValueSet then we query it (via RetrieveClaimValue) for extracting the specific claims we are being requested to issue. The query logic is trivial:
private XElement GetClaimValueSet(string identity)

   {

       XElement root = XElement.Load(Constants.AttributeStore1Path);

       IEnumerable<XElement> entry =

           from el in root.Elements(“Citizen”)

           where (string)el.Attribute(“ID”) == identity

           select el;

       if (entry.Count() != 0)

       {

           return entry.First();

       }

       return null;

   }
private string RetrieveClaimValue(XElement el, string claimType)

{

    IEnumerable<XElement> entry =

        from ell in el.Elements(“Attribute”)

        where (string)ell.Attribute(“Uri”) == claimType

        select ell;

    if (entry.Count() != 0)

    {

        return entry.First().Attribute(“Value”).Value;

    }

    return “”;

}
Card Issuance logic
This is technically not part of the STS itself, but it is useful if you want to test the project. The code of this part, mainly the default.aspx page and its code behind, didn’t change much since I described it in this zermatt post: you can reuse it pretty much verbatim.
The RP
There are some key changes in geneva framework that will prevent this from working: after Thanksgiving I plan to post an update to it, in the meanwhile you can take any cardspace RP sample in the geneva framework and tweak it to accept tokens from your new STS if you want to play with it
Wrapup
In the first installment of this post I tried to make the point that the STS is a cornerstone in the architecture of an IP, and as such it demands careful planning: and I made the point that your best bet is relying on a shrink wrap product, which likely already contains a lot of the intelligence you need for running your IP. I gave some criteria you can use for understanding some of the features you’ll want in an STS that satisfies your need, and shown that Geneva Server covers a very broad range of scenarios: then I identified few borderline cases in which a custom STS makes sense, as long as ypou are aware of all the tradeoffs involved.
In the current installment I gave a rough, generic description of the token issuing flow; then I went in the details of how the geneva framework programming model can be used for writing a custom STS. Finally, I backed some of those explanations with working code.
STSes are a fascinating topic, and I am sure we’ll get back to them in the future. I hope this two posts gave you an idea on where to start: if you want to know more or you have feedback, as usual feel free to drop a line.
Those two posts owe a lot to discussions with Hervey, Jan, Stuart, Shiung, Govind and Raffaele: but if you find any error of course you can blame them on me 🙂

Hi,
excellent post!
an (even) more detailed description of the STS token generation pipeline can be found here:
http://www.leastprivilege.com/SAMLTokenCreationInAGenevaSTS.aspx
Hi,
Vittorio, thanks for the excellent post. Trying to make an STS with Geneva without any guidance is pretty hard.
Is it possible to get this sample application for insight, without doing the complete configuration?
Thanks in advance
Great post!! Exactly the scenario I was looking for (Information cards with certificates).
Thanks
Great article. Thanks for the info; it is invaluable. I have a question about something you said though:
“Note, new in Geneva Framework: adding signing credentials [in the SecurityTokenServiceConfiguration class’s constructor] does not imply that those will be automatically be used: we will have to explicitly select those in GeScope.”
Why does this class still require an encryption key if the one given at construction is not necessarily the one that is going to be used? Why is it needed at creation and in the call to GetScope?
TIA!
Very clear reading, thanks Vittorio
i got this error “SecurityTokenException: The issuer of the token is not a trusted issuer” when i integrating sharepoint 2010 with acs v2